In this presentation, Square describes why they embraced Isolated Development to scale their Android and iOS codebase horizontally while keeping engineers productive. By running single features in a development sandbox environment and applying DPE practices like build scans and build caching, Square opened up many opportunities for improving developer productivity as their application grew. Watch how they turned these concepts into reality, how teams adopted these isolated development apps, and how they reduced build and IDE sync times by 10X.
Note: while Ralf is currently at Amazon, this talk was prepared when we worked at Square.
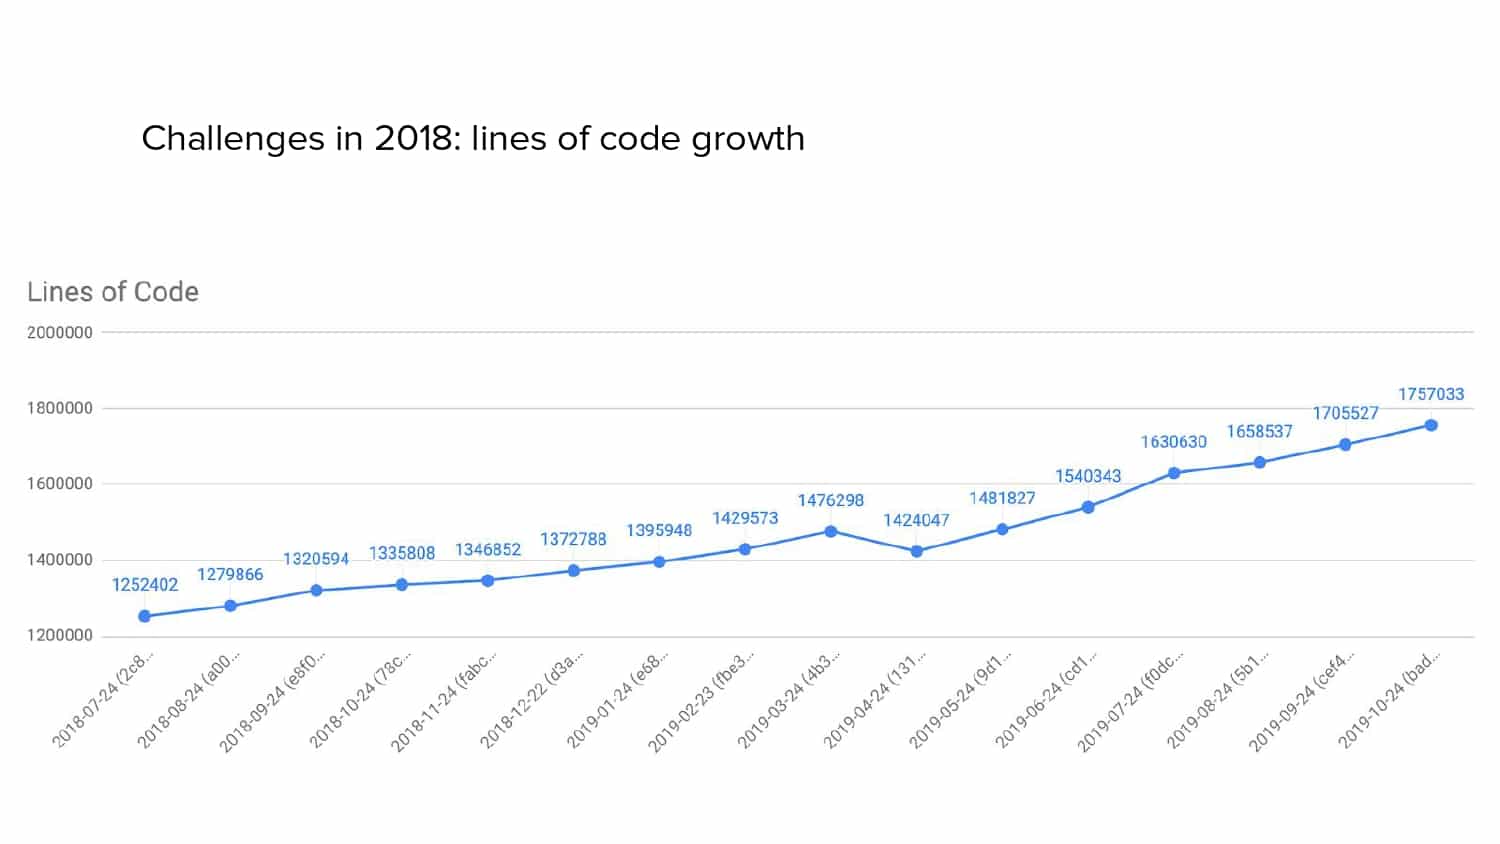
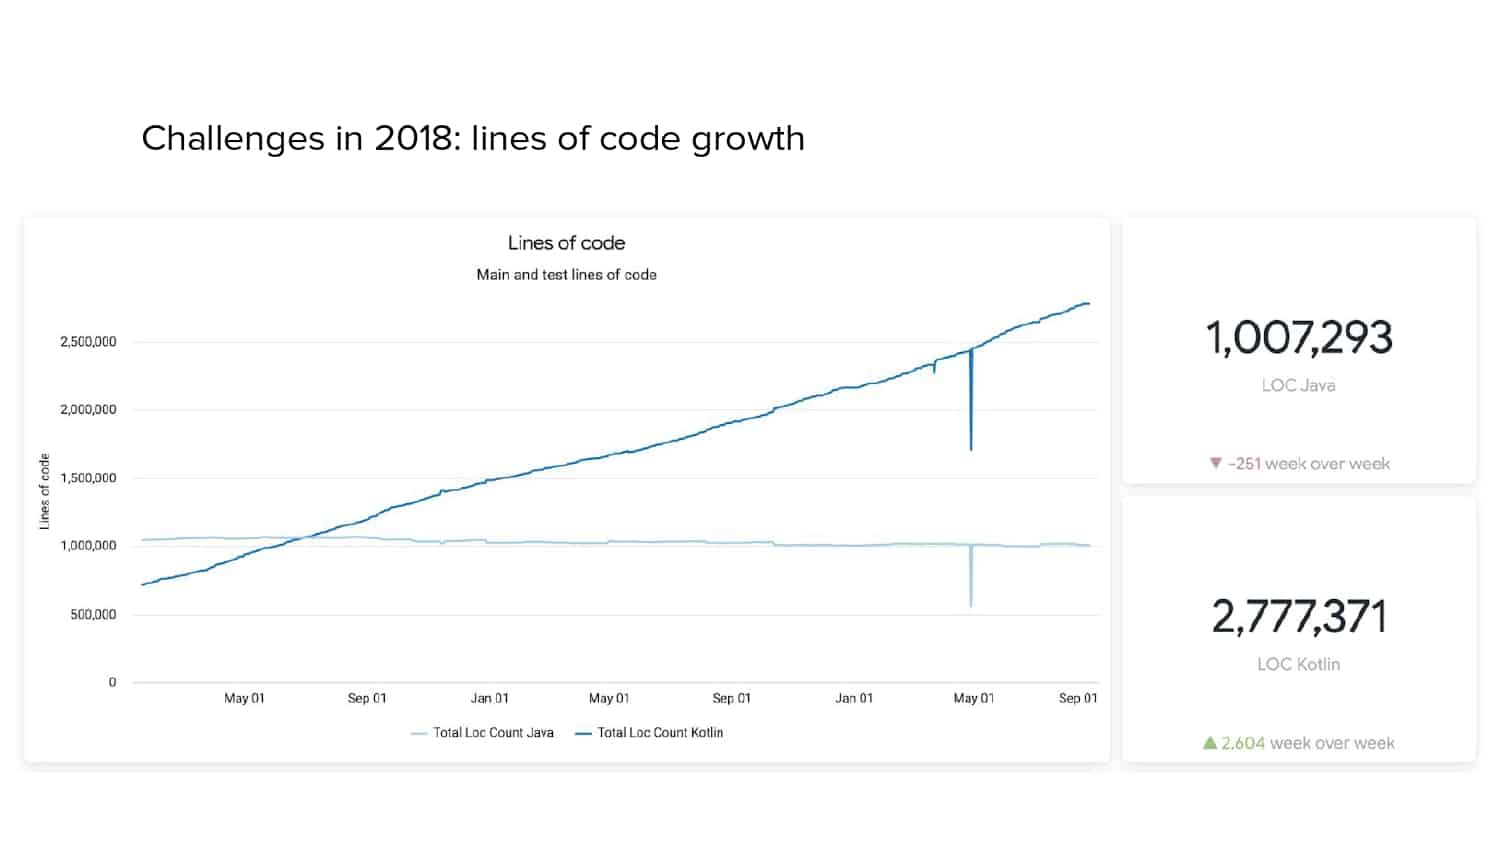
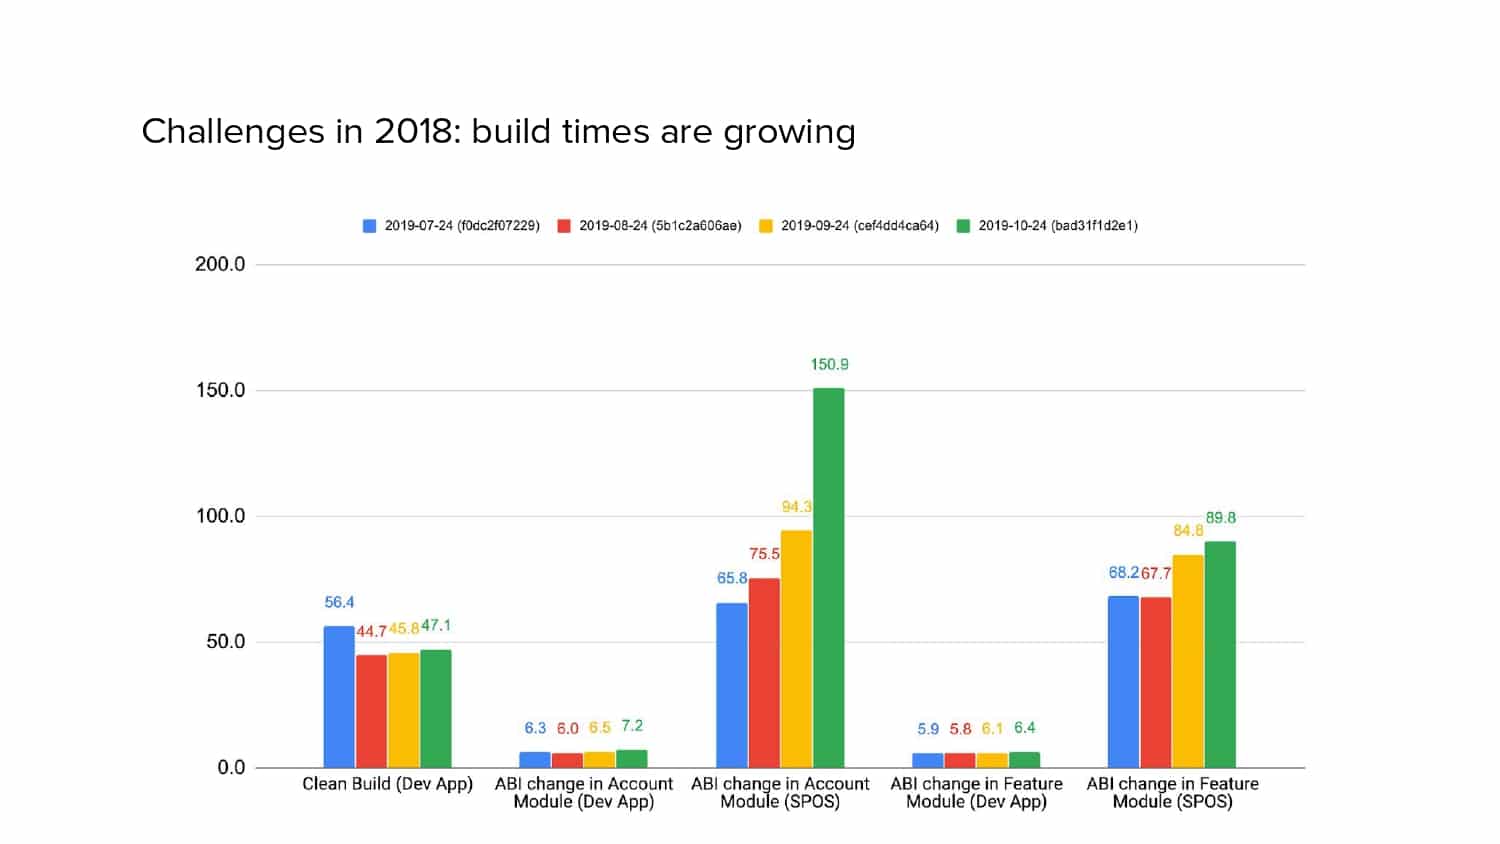
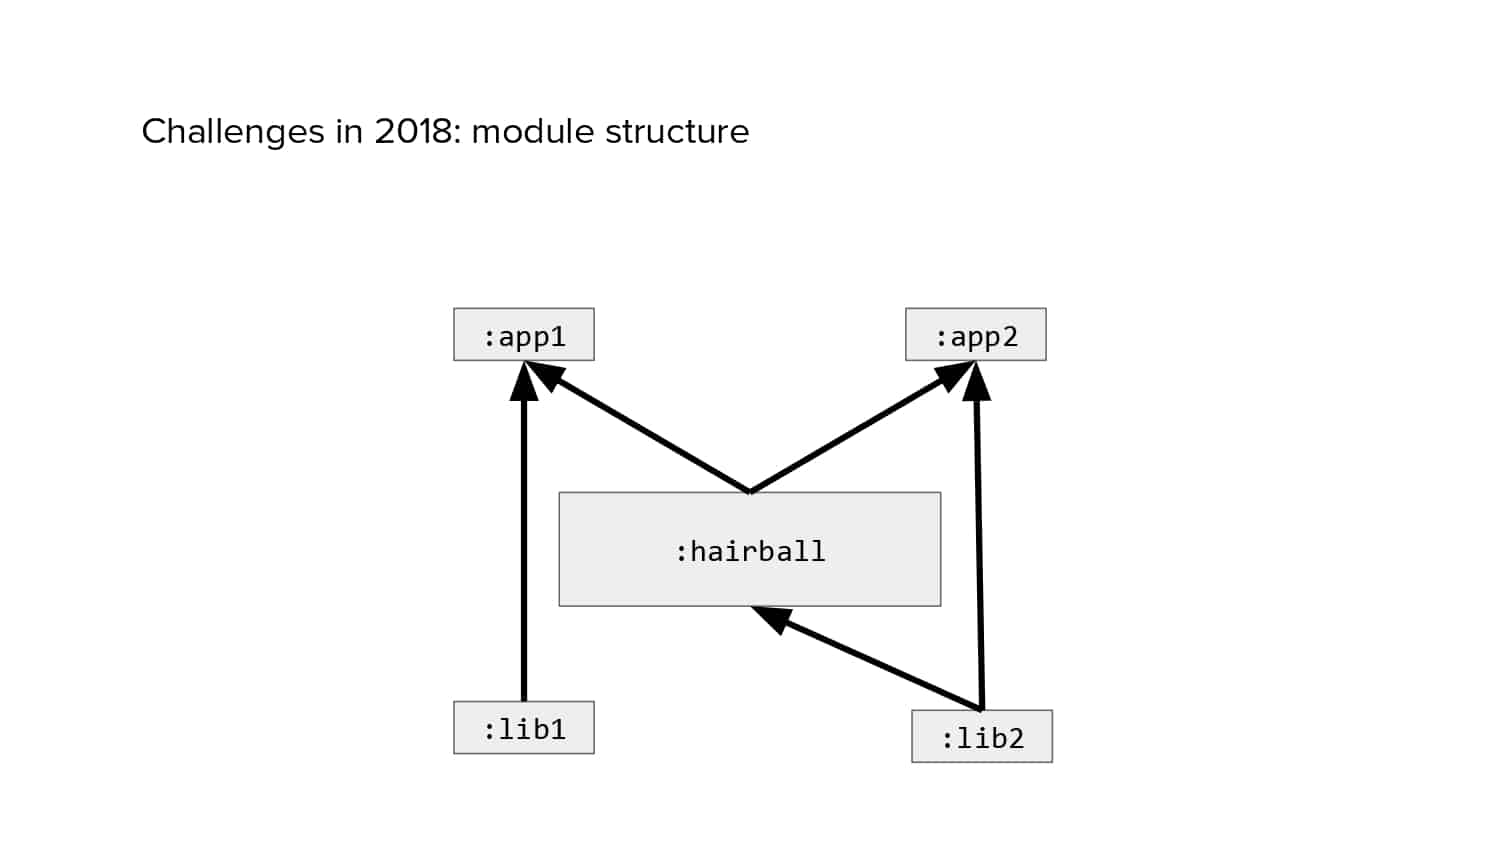
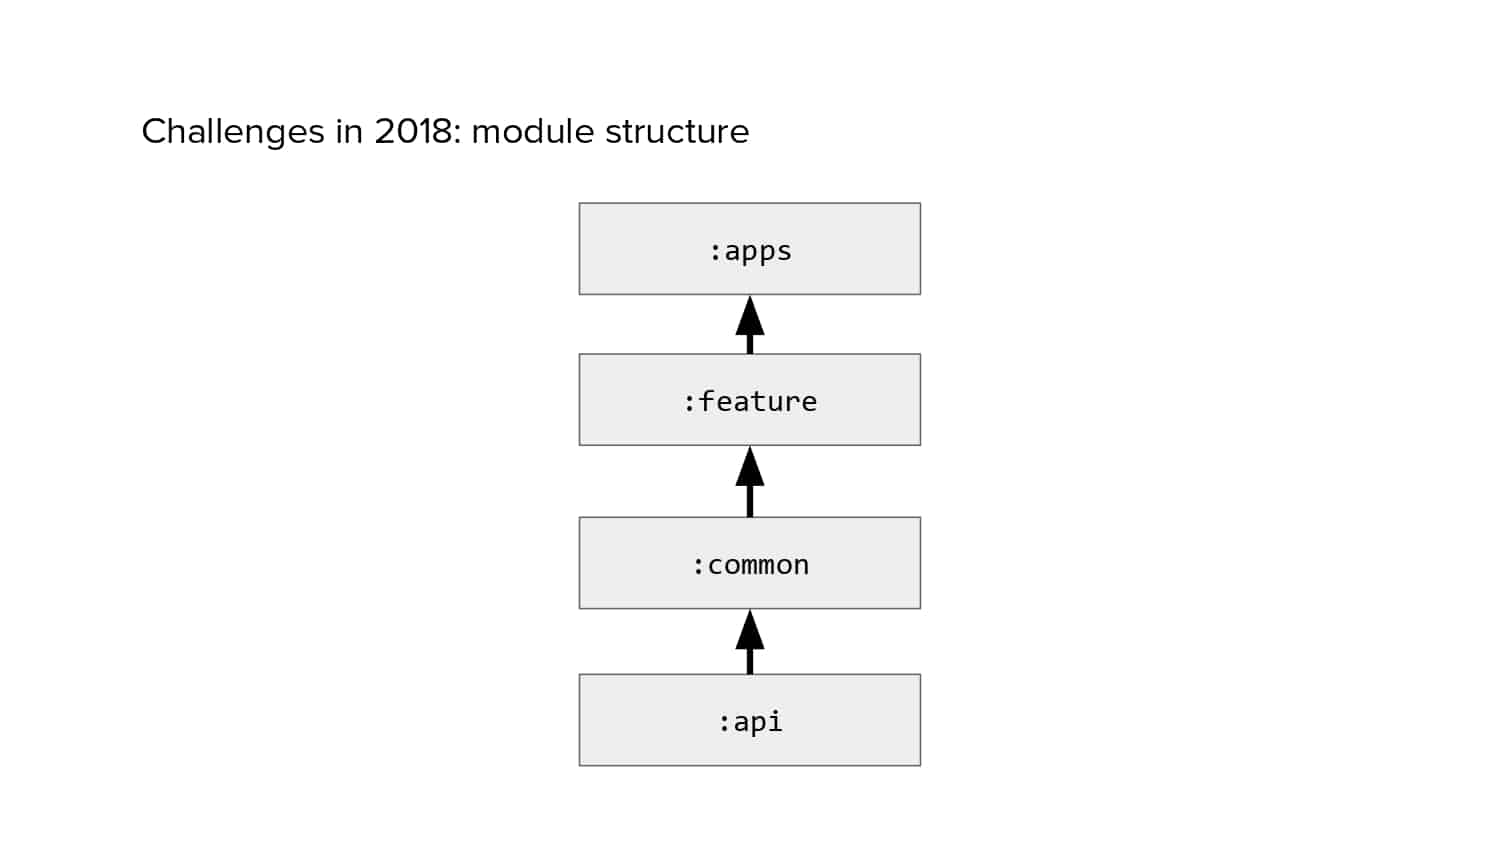
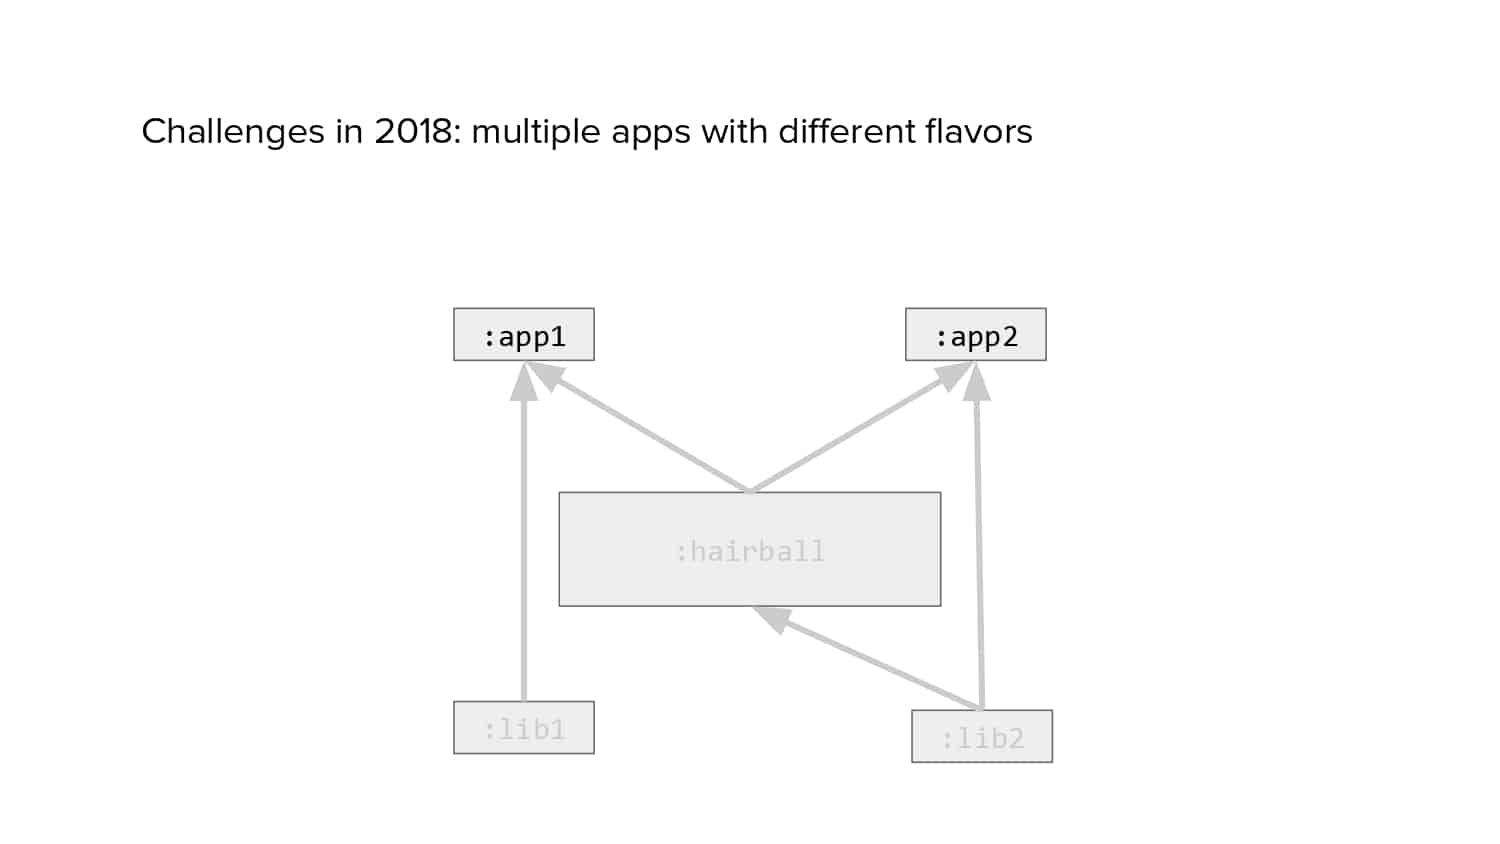
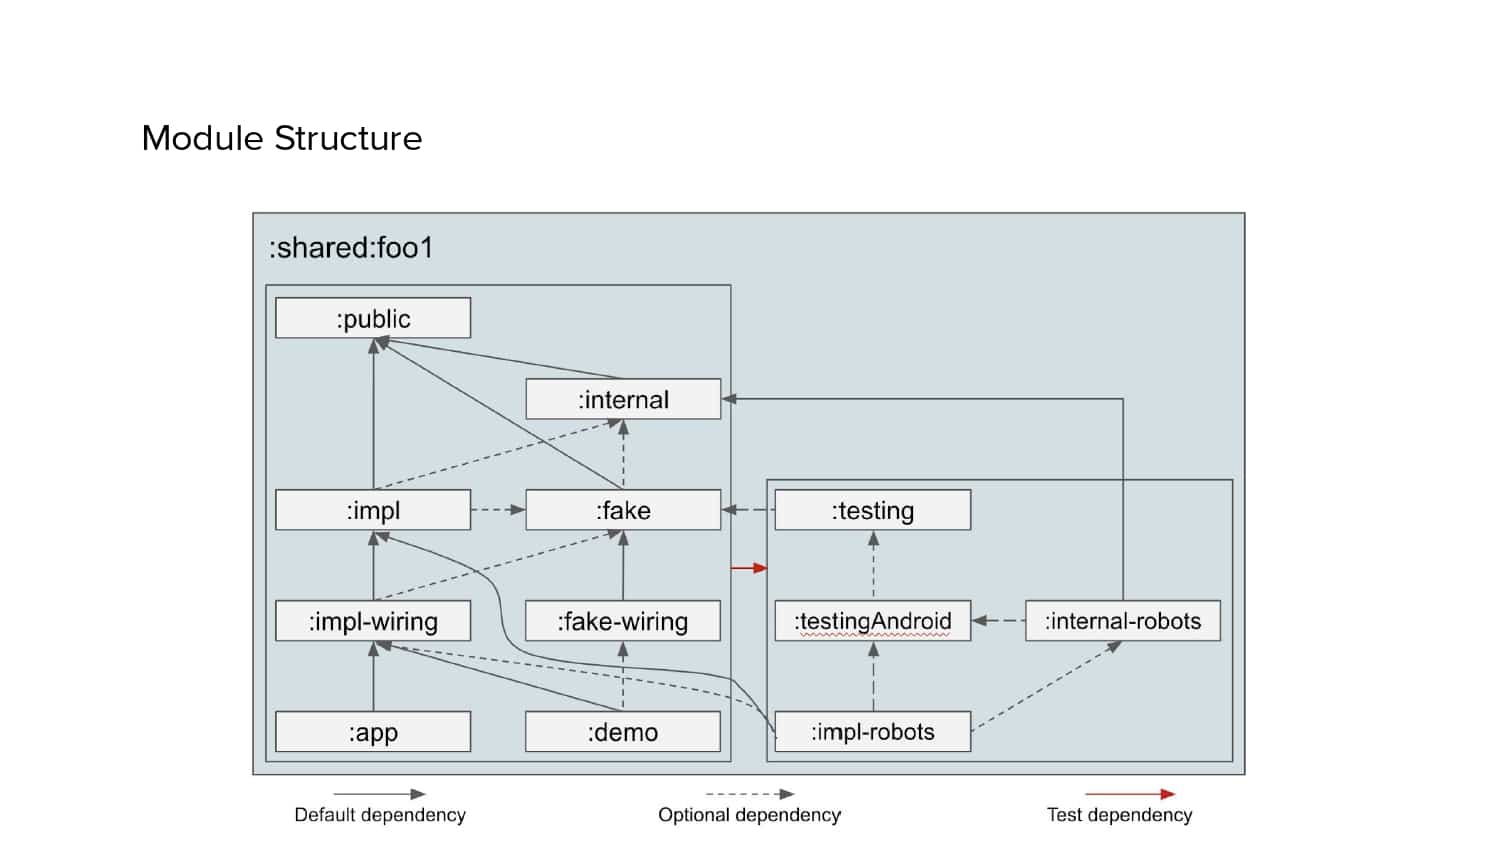
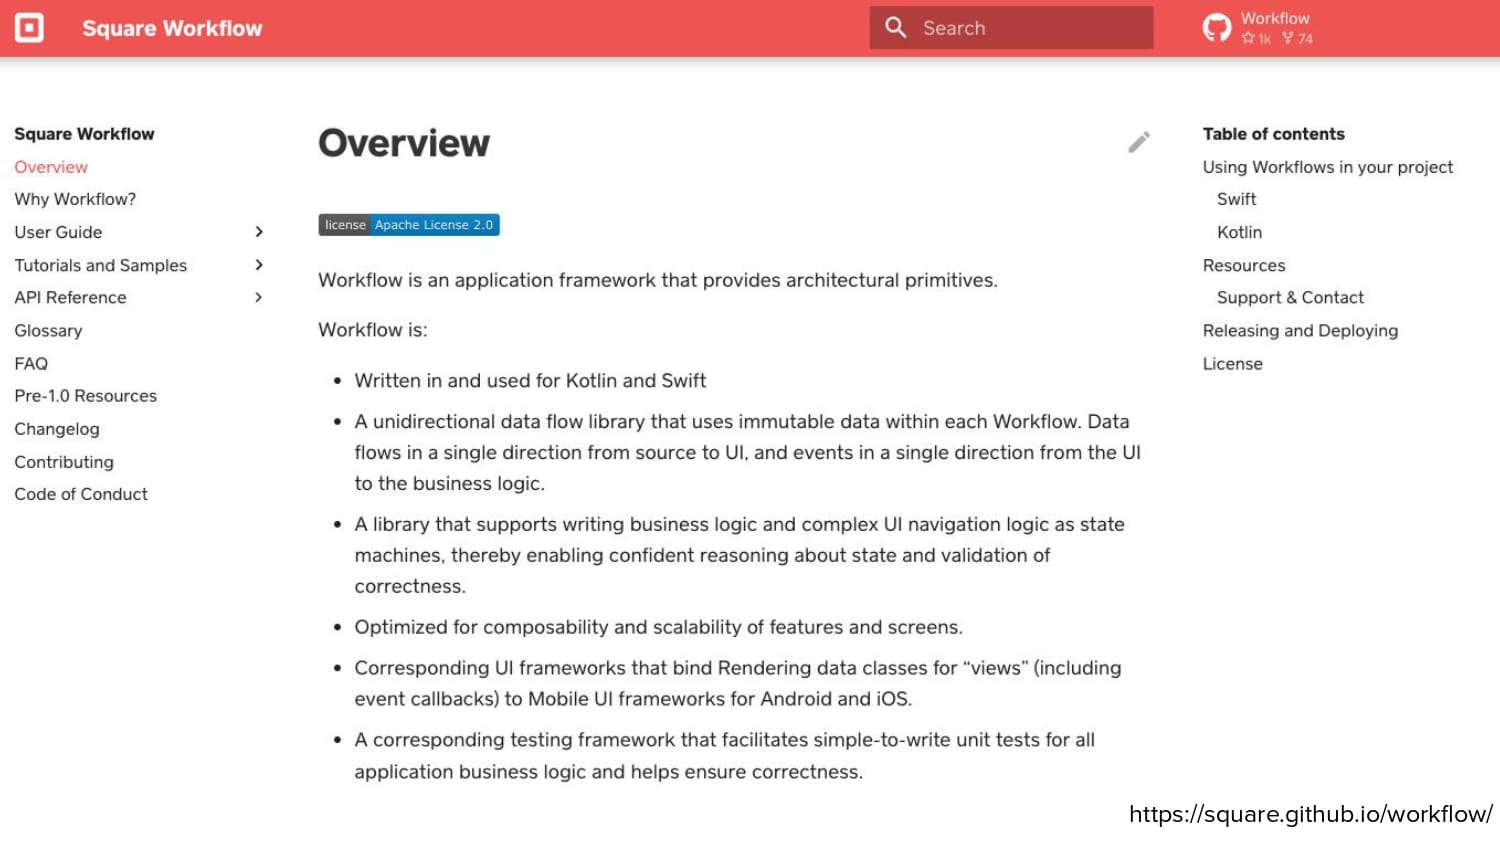
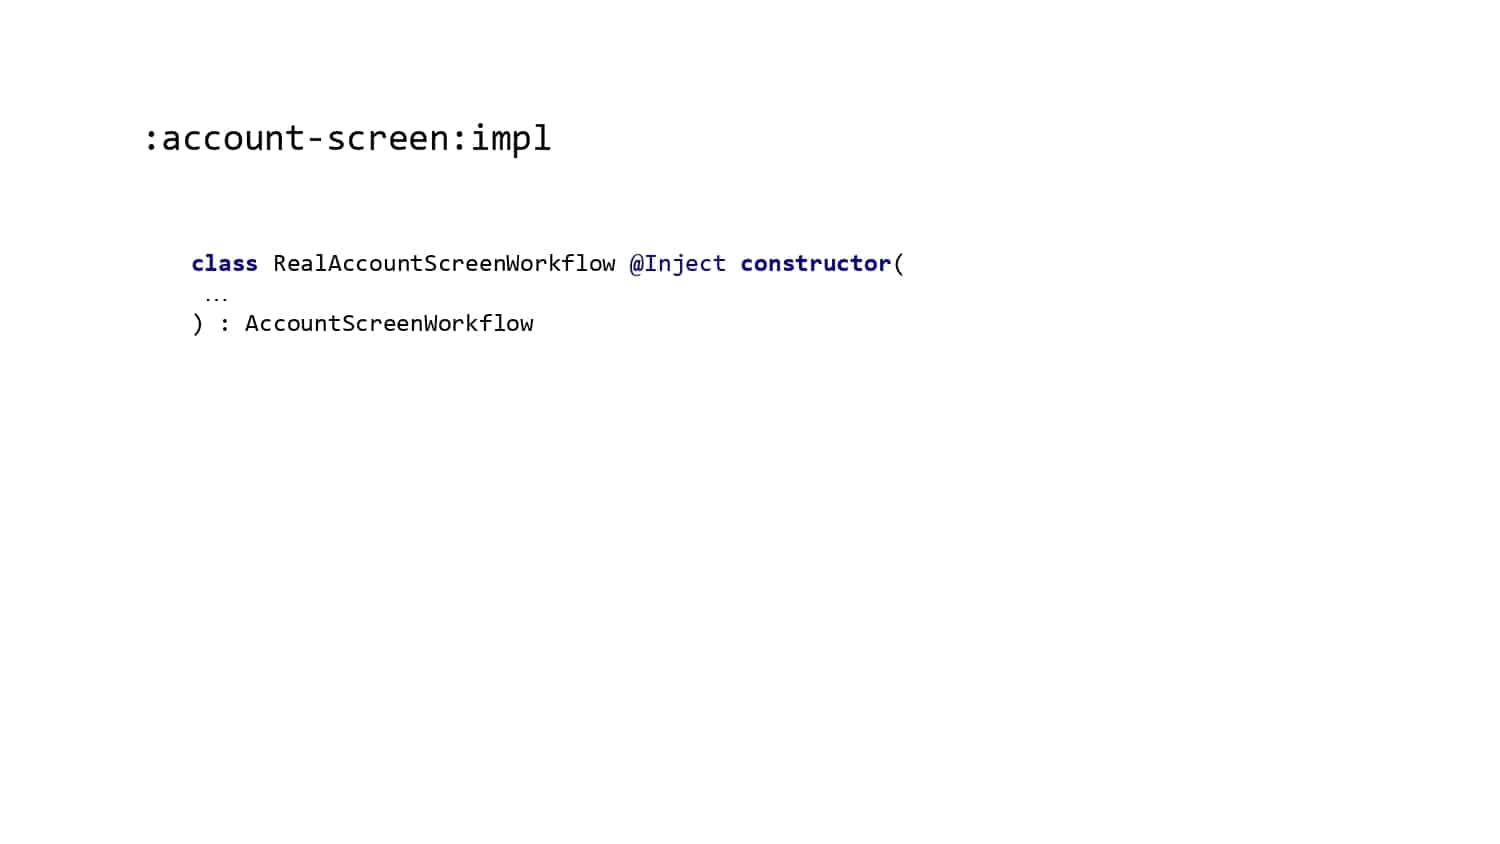
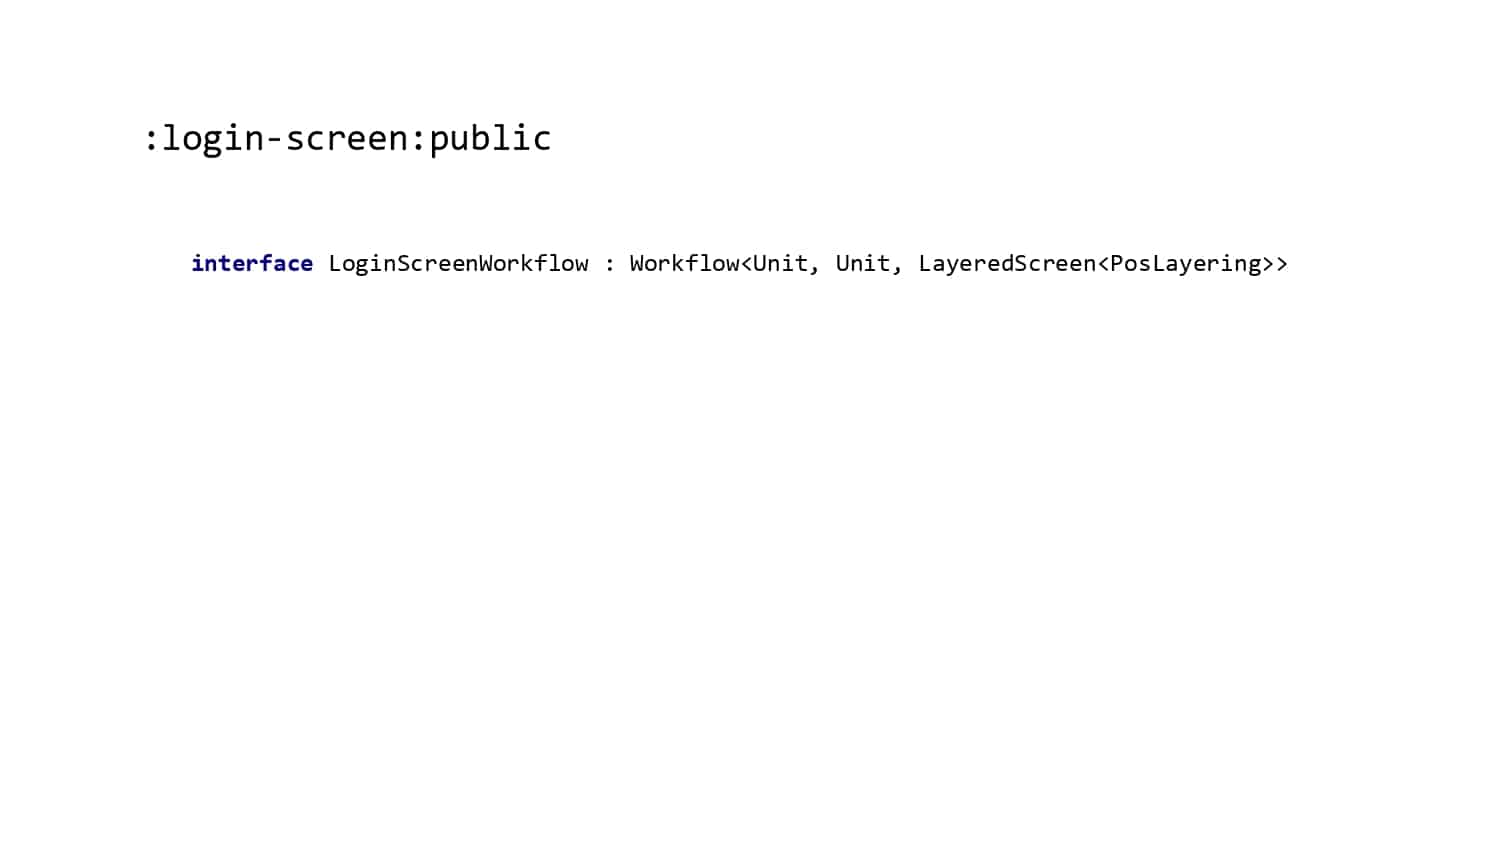
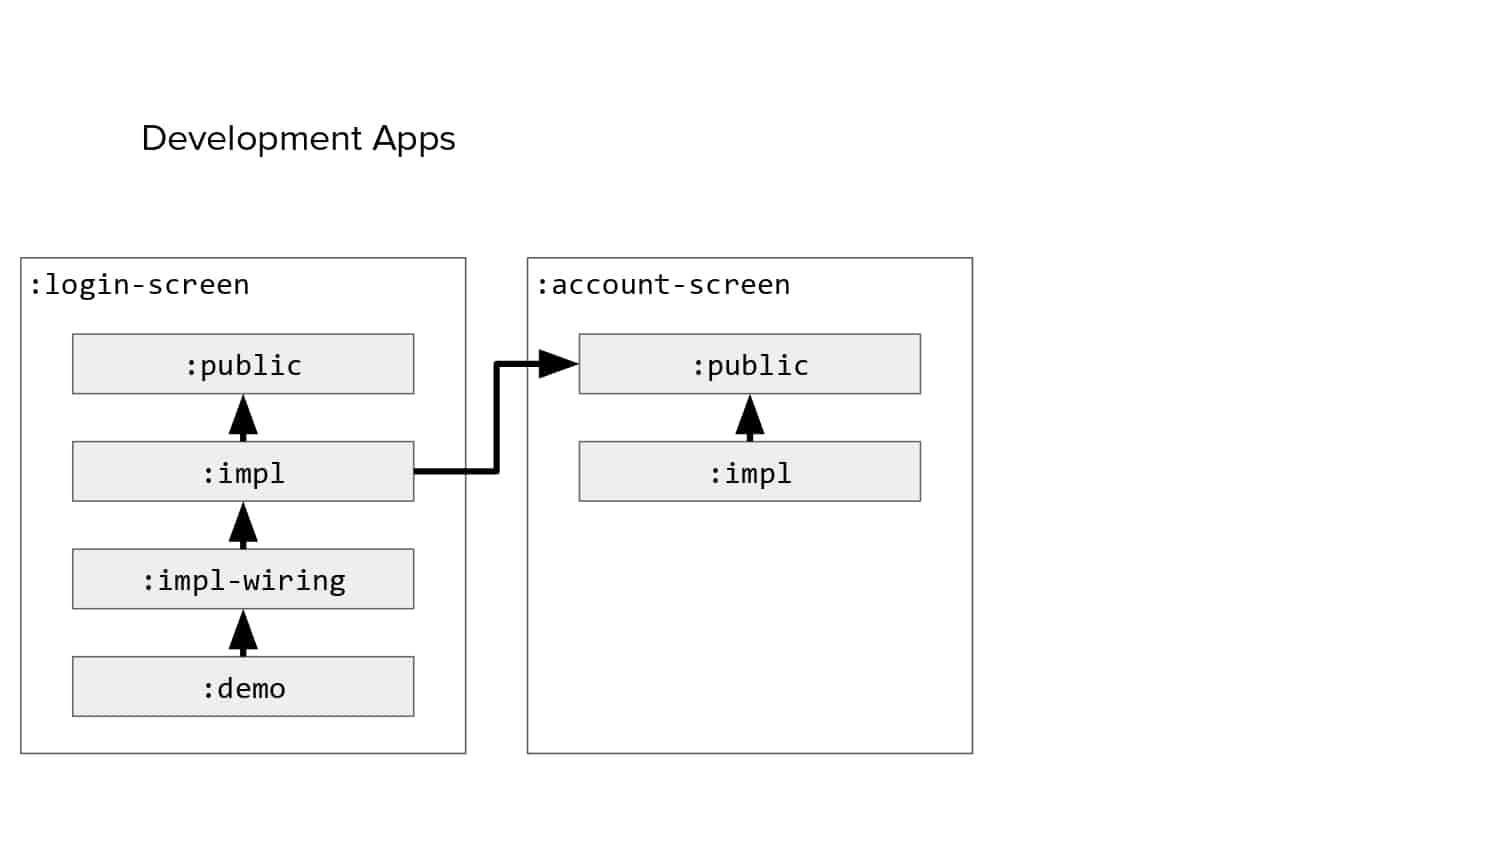
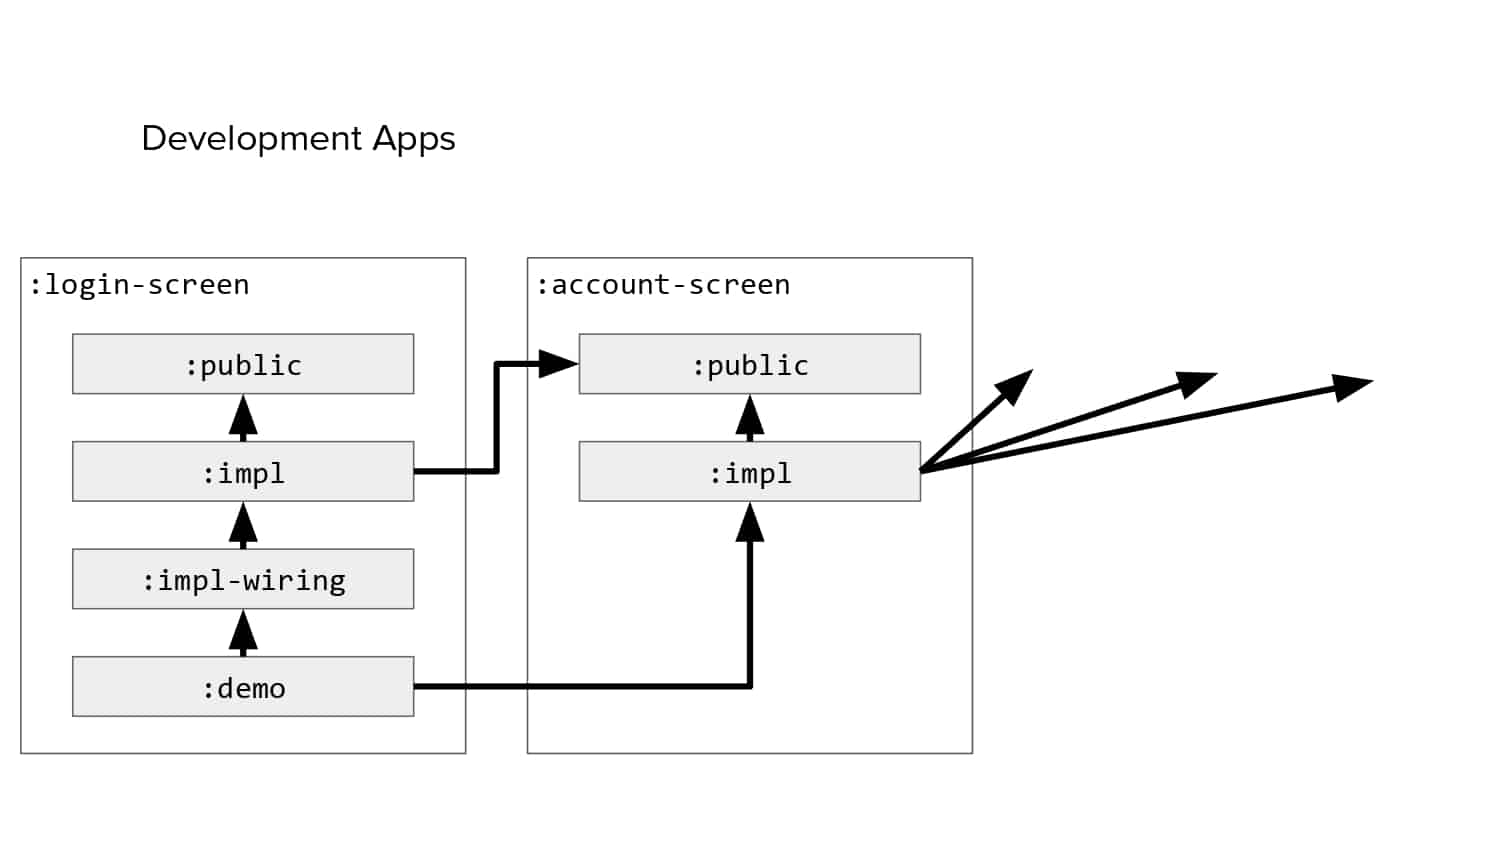
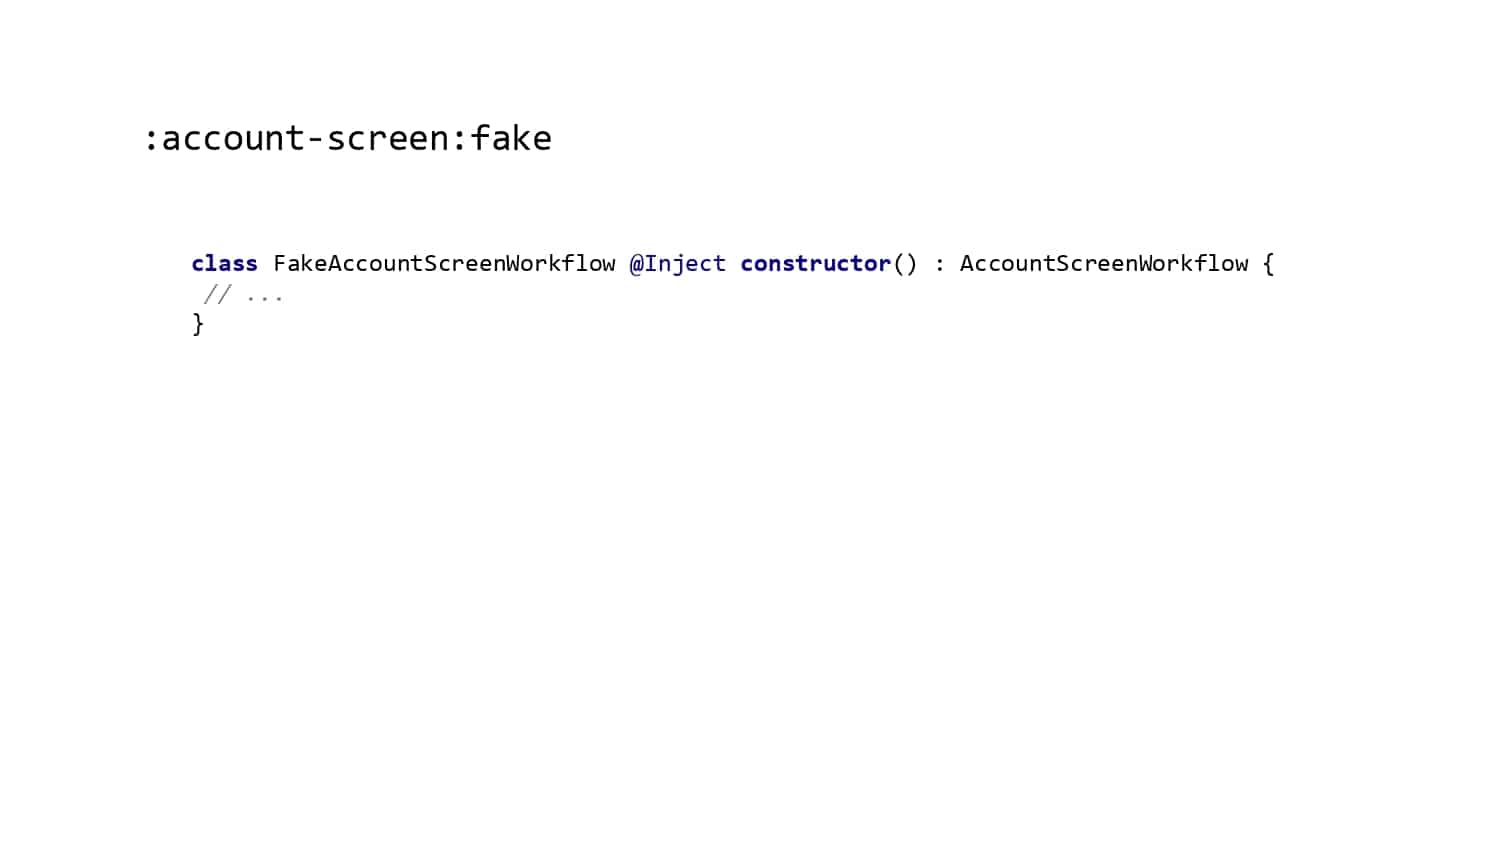
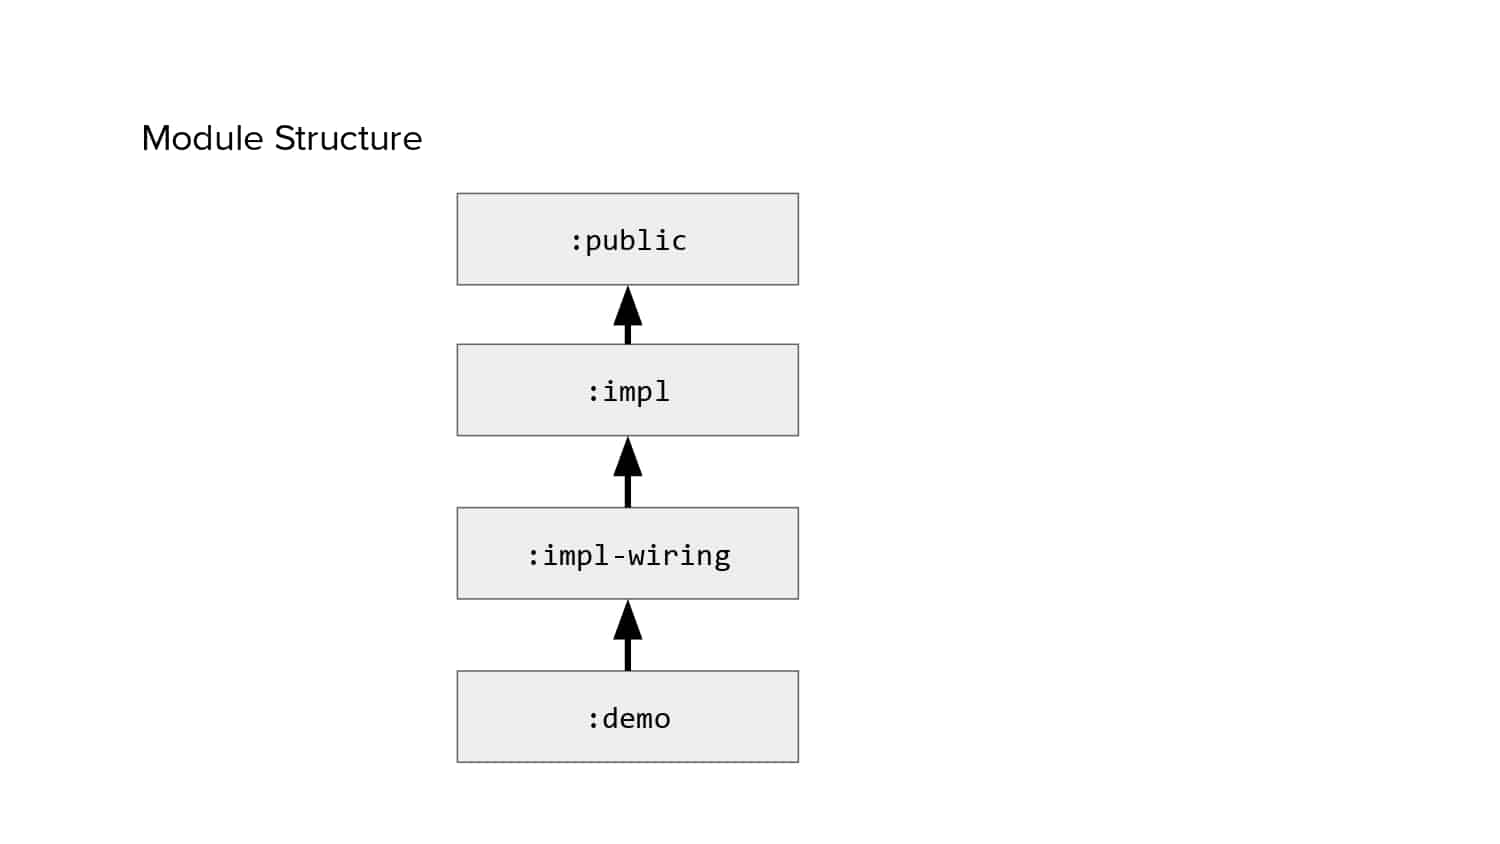
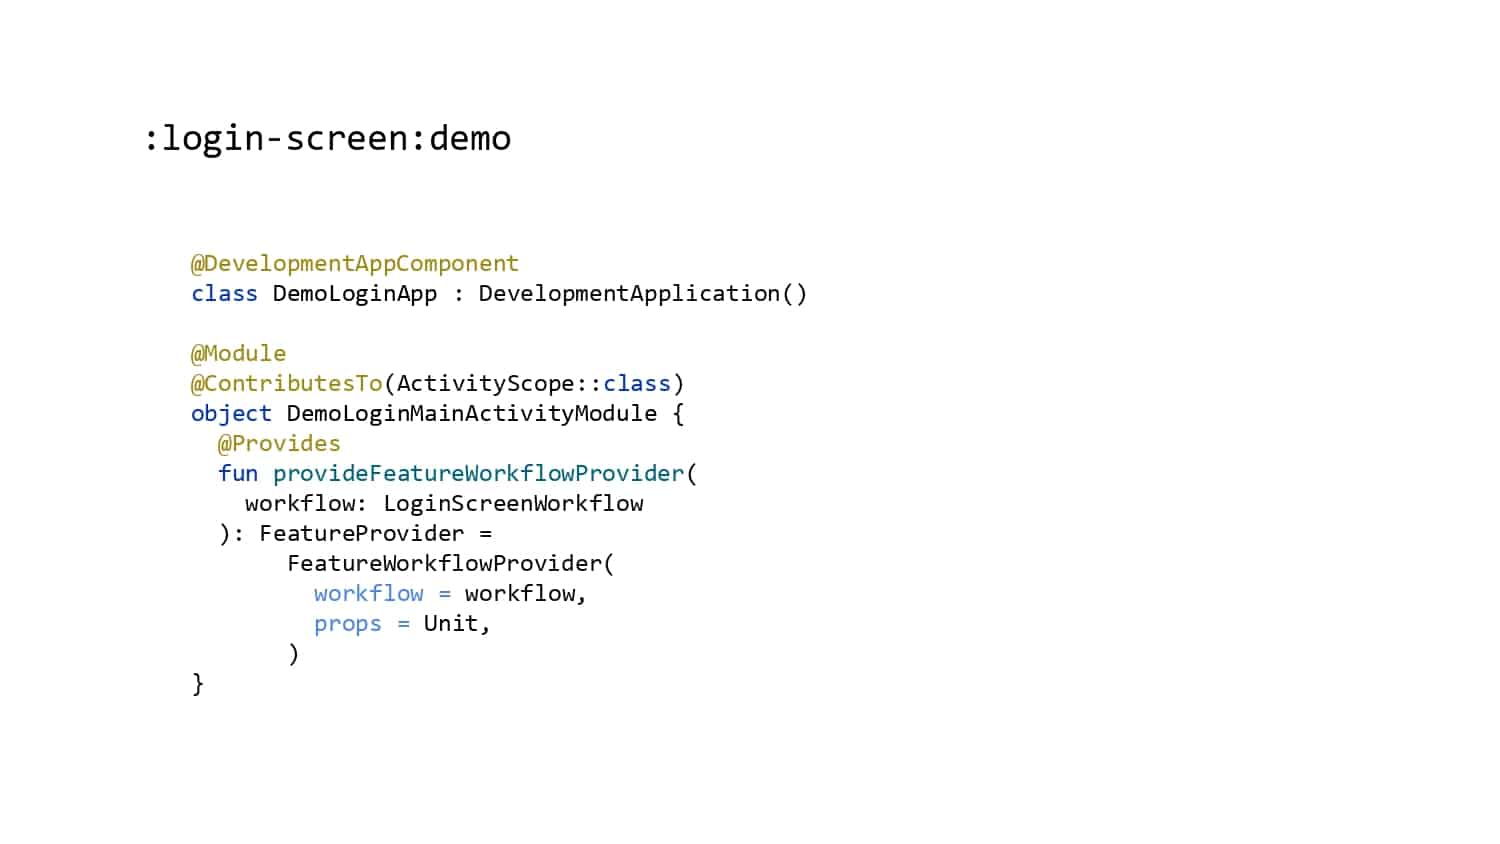
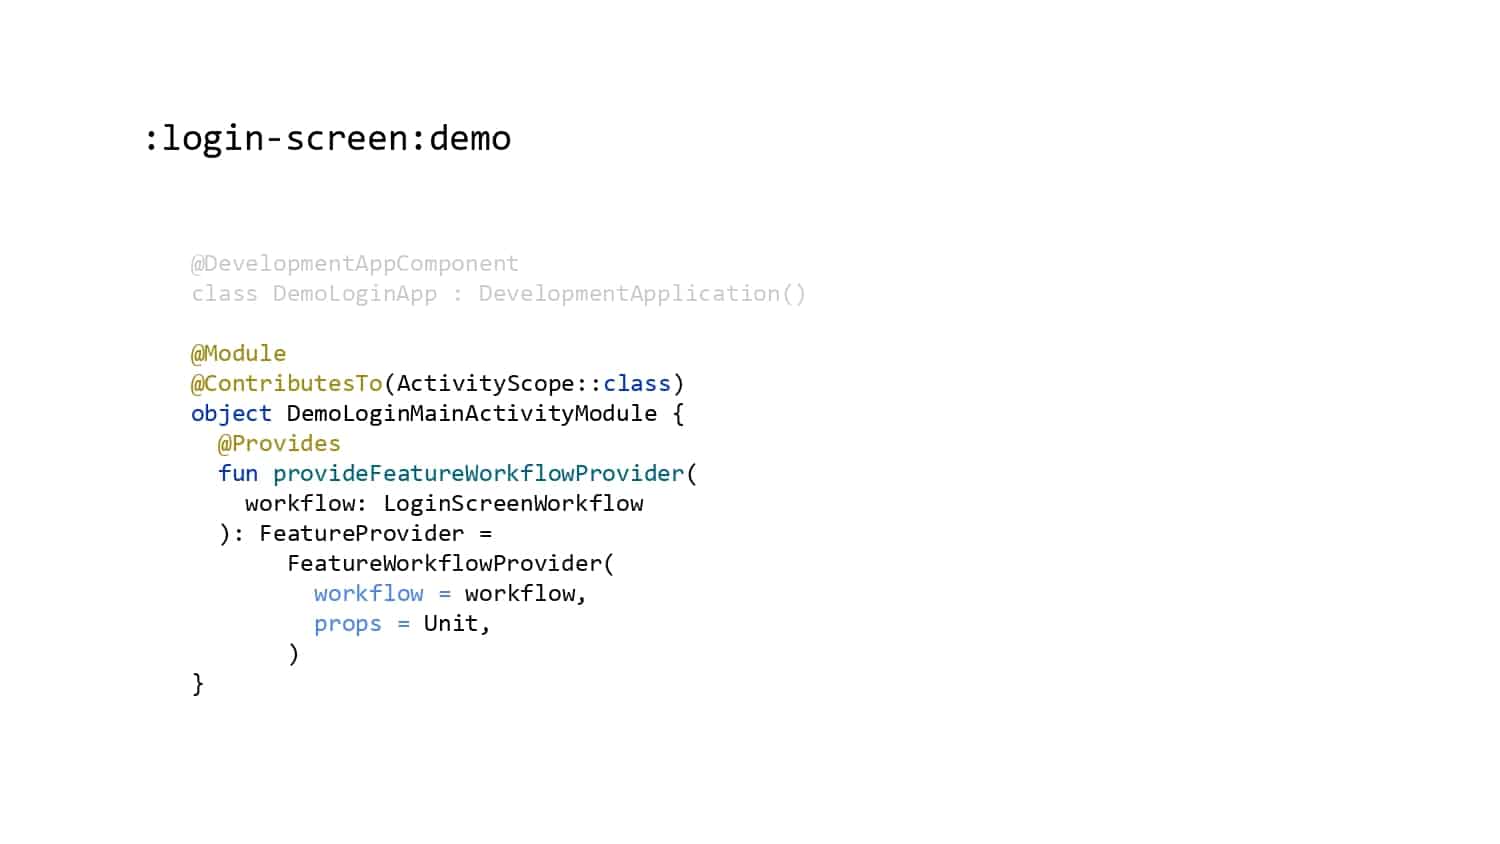
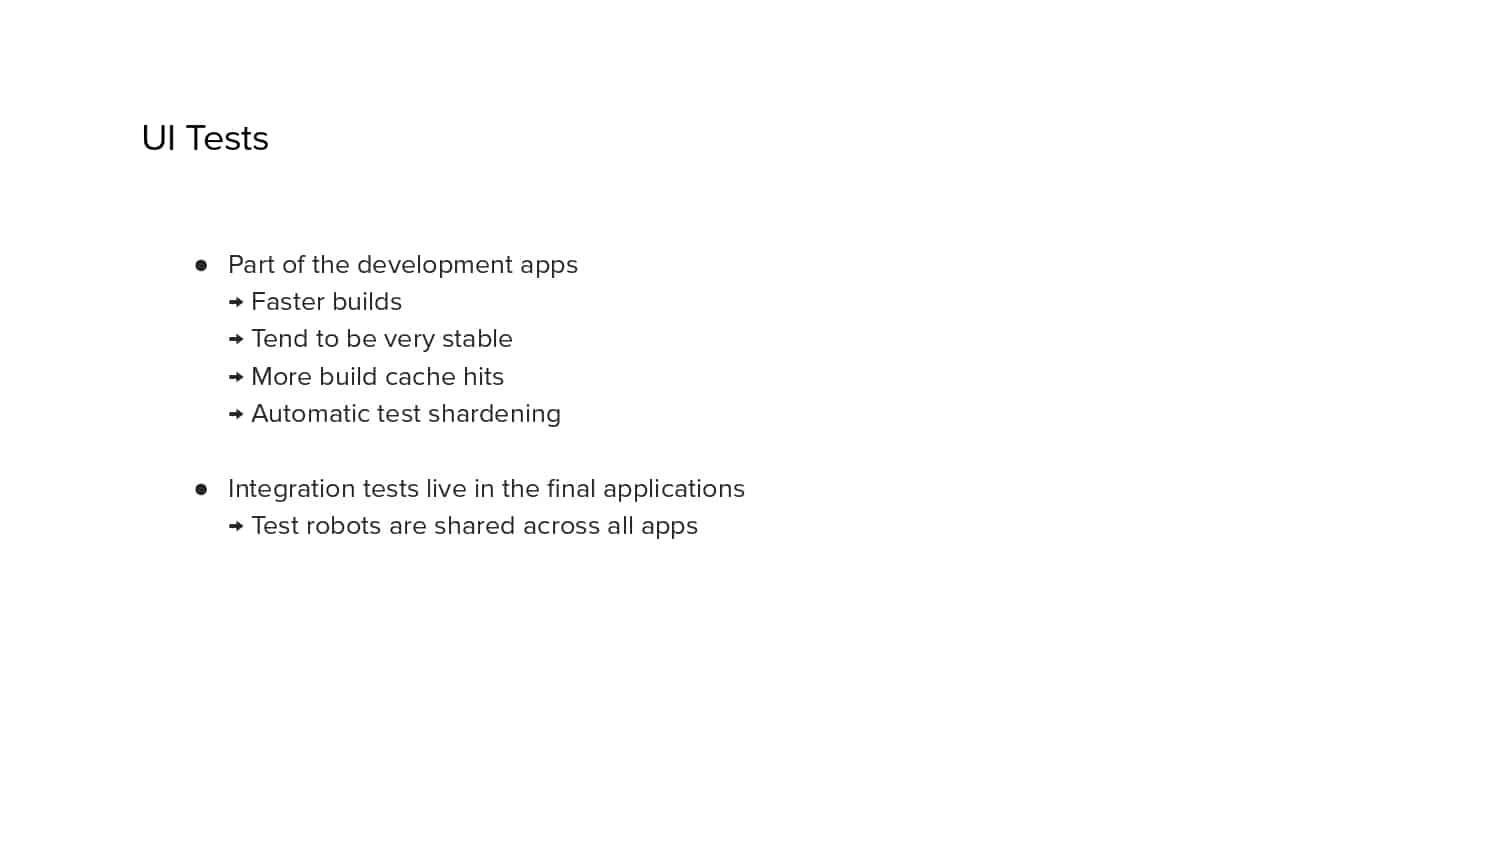
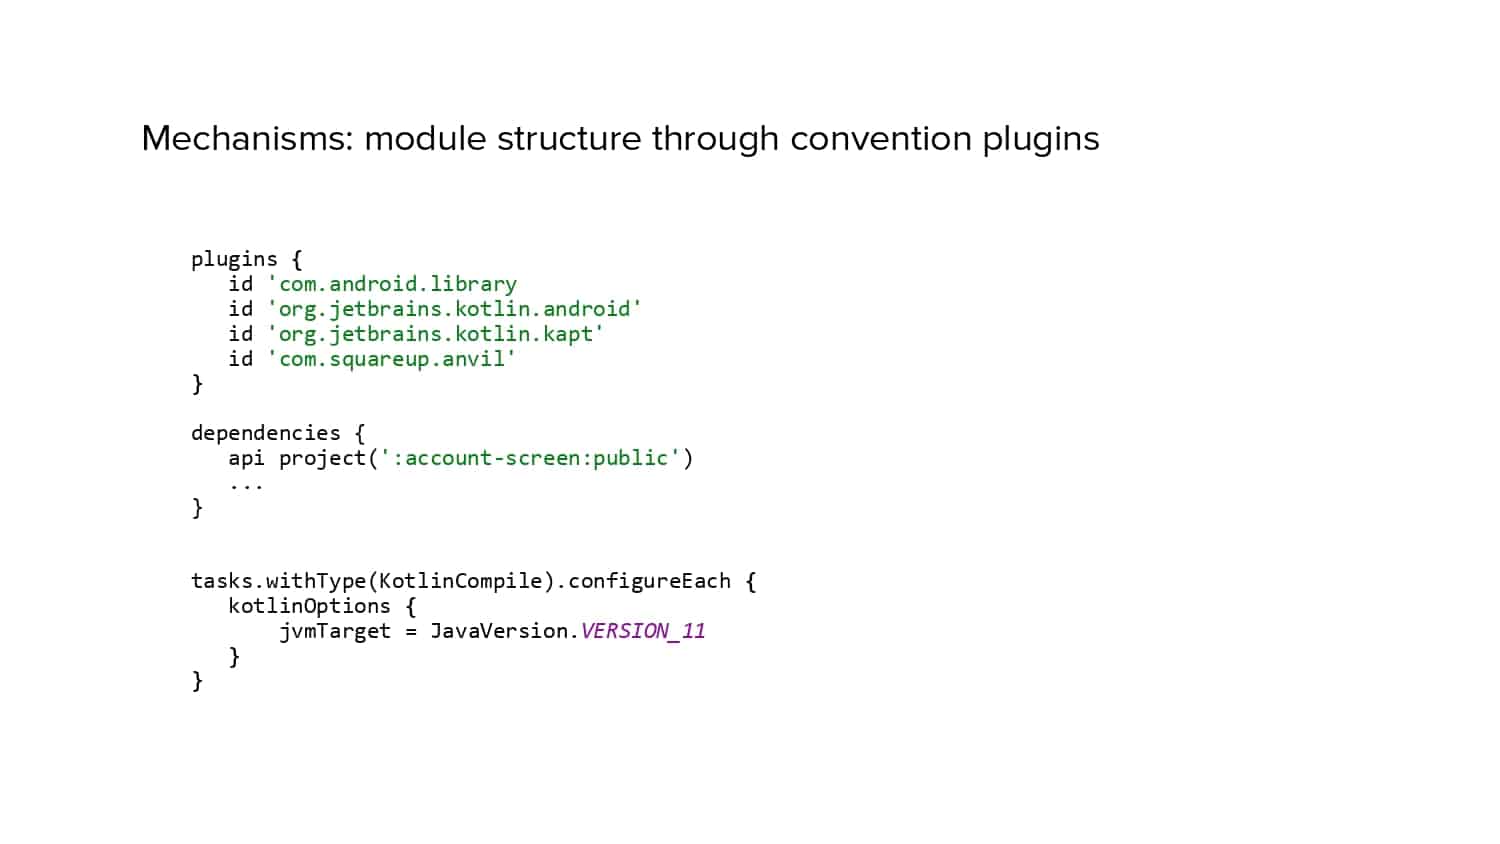
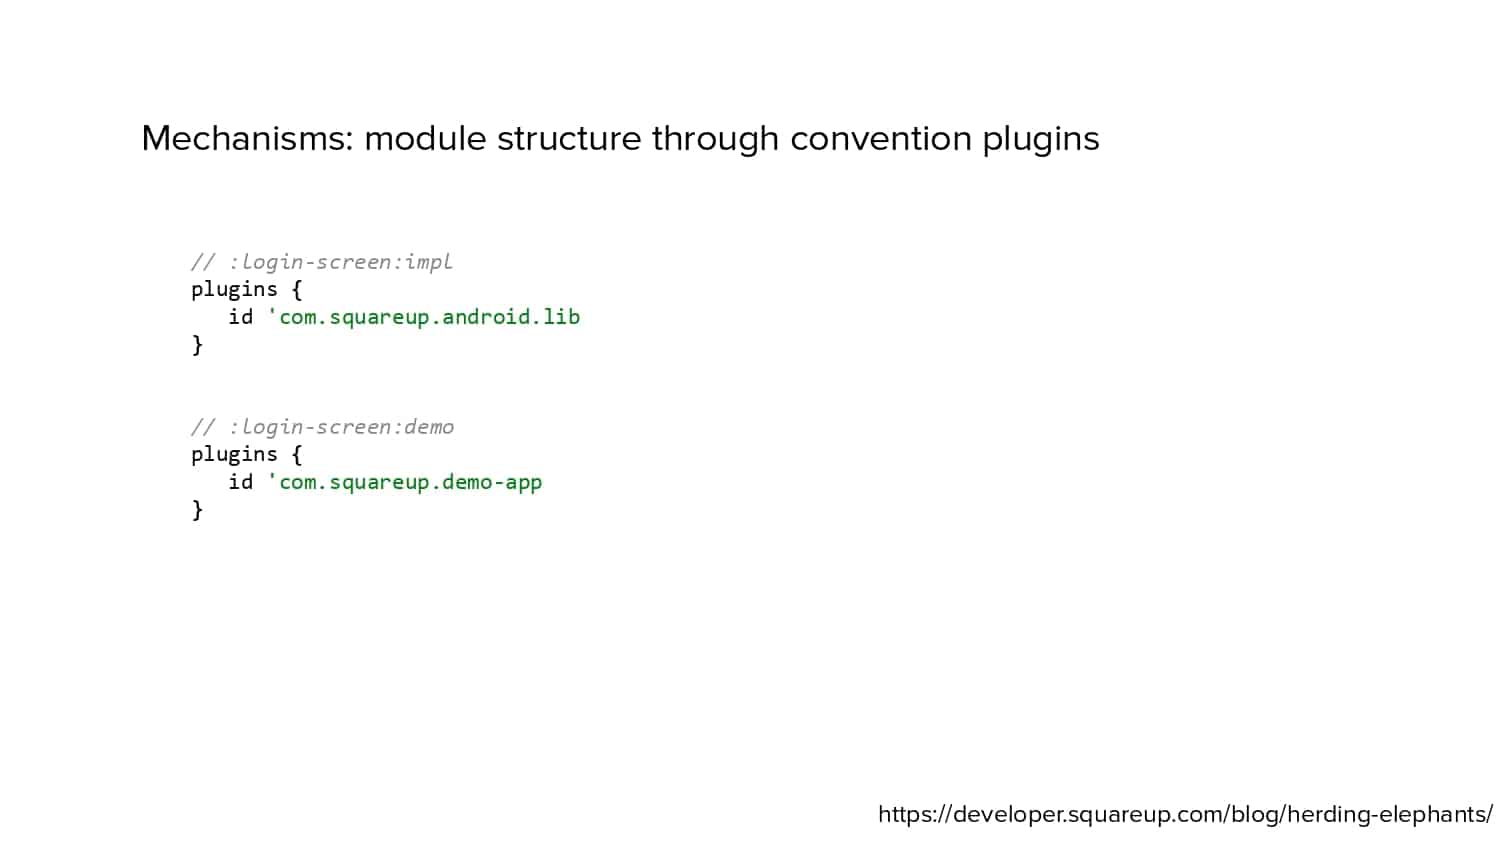
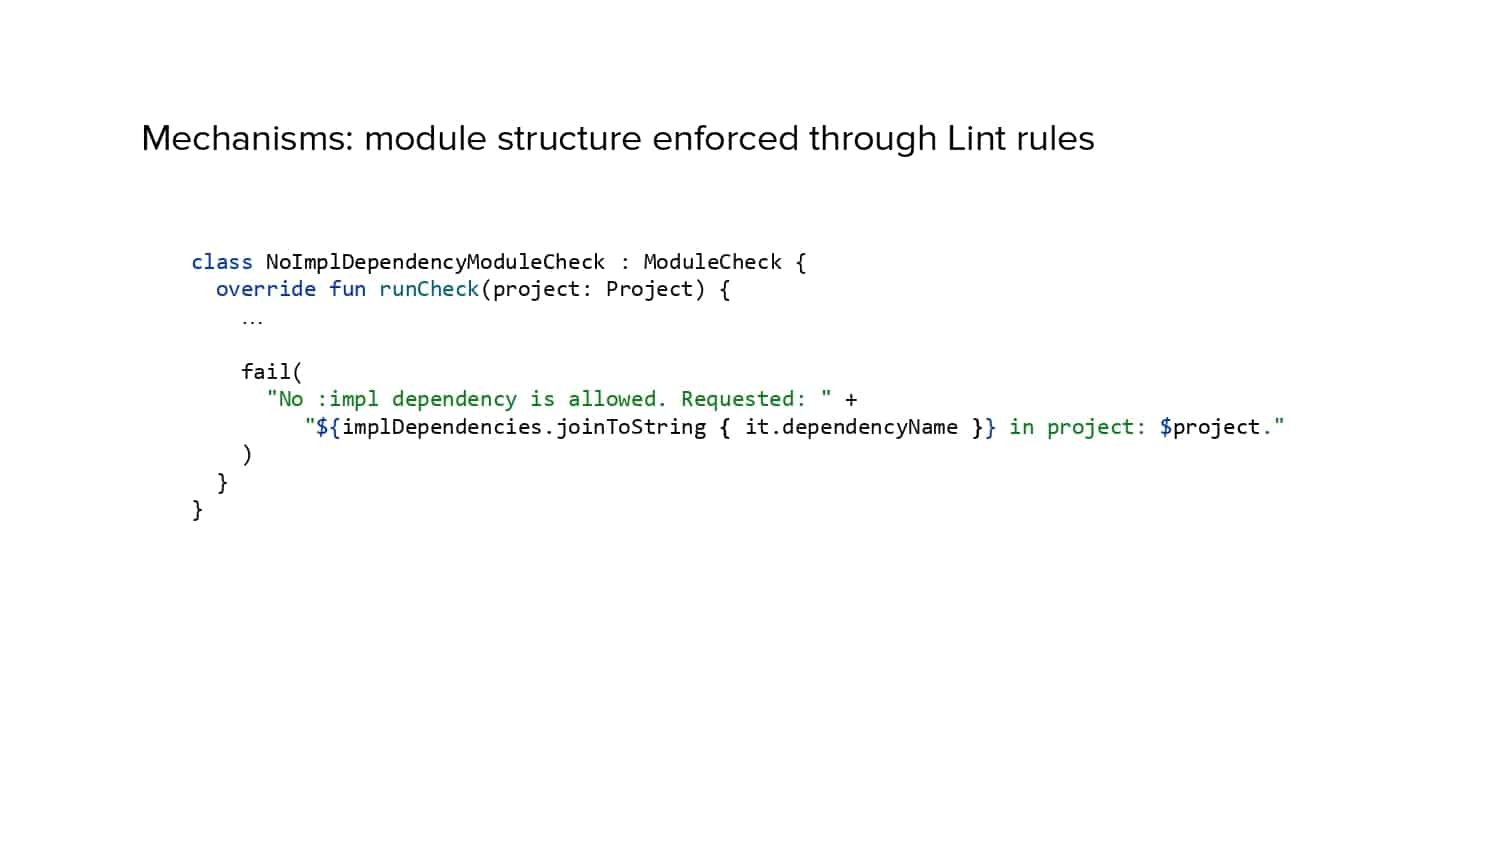
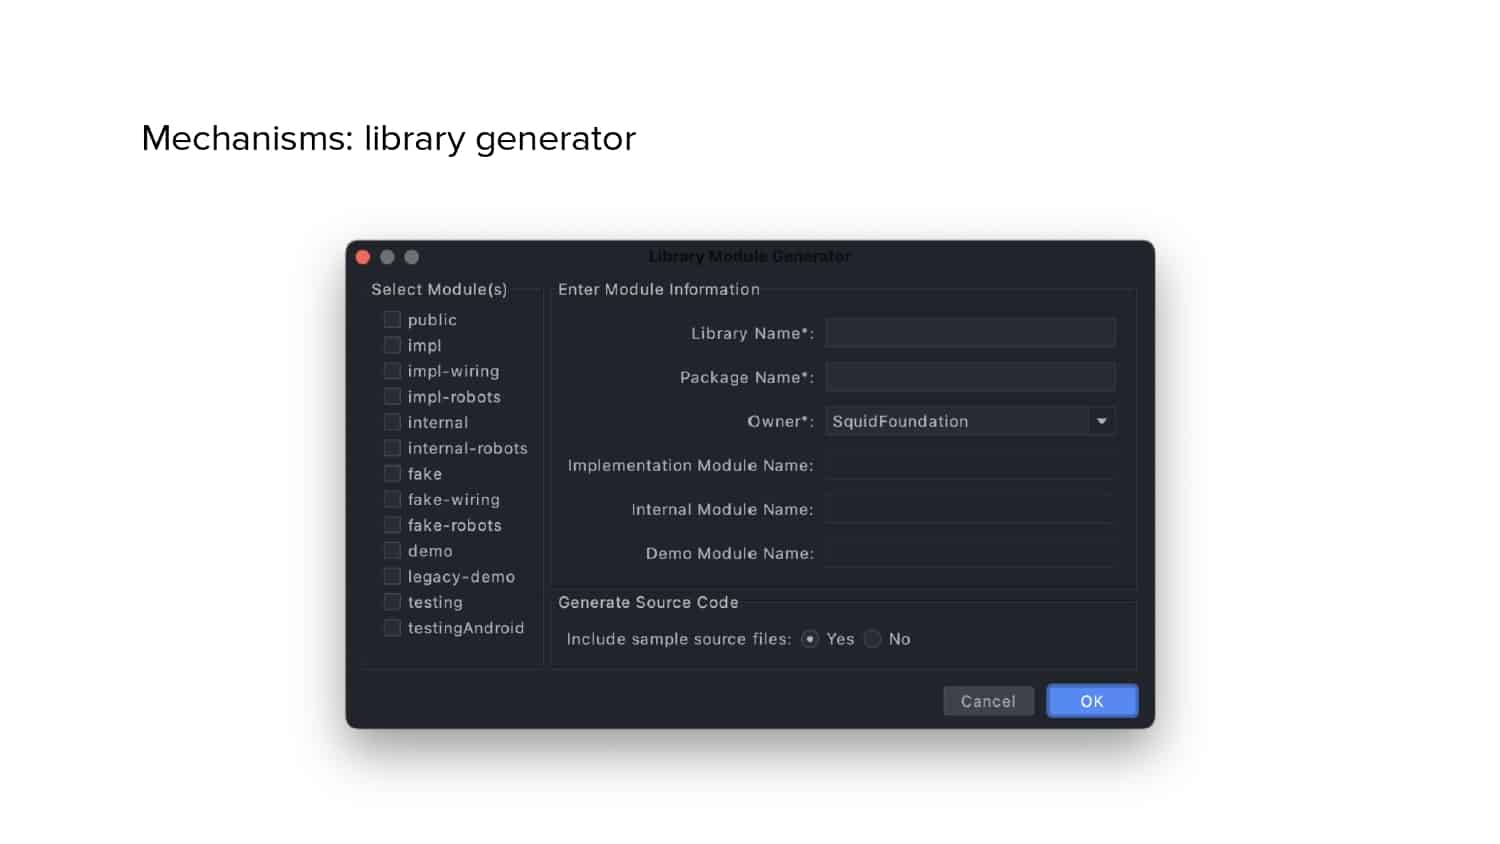
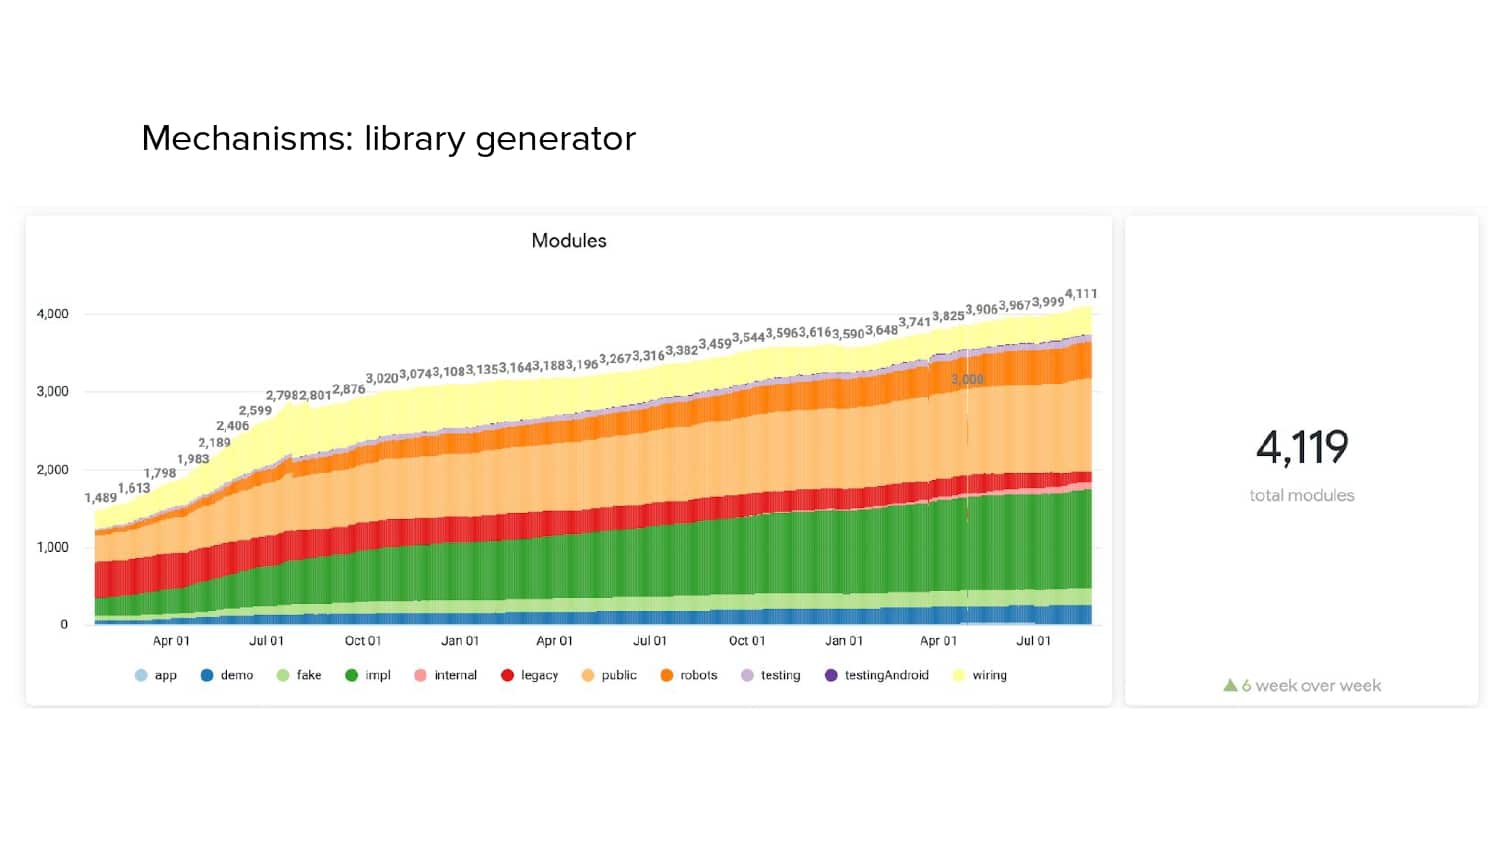
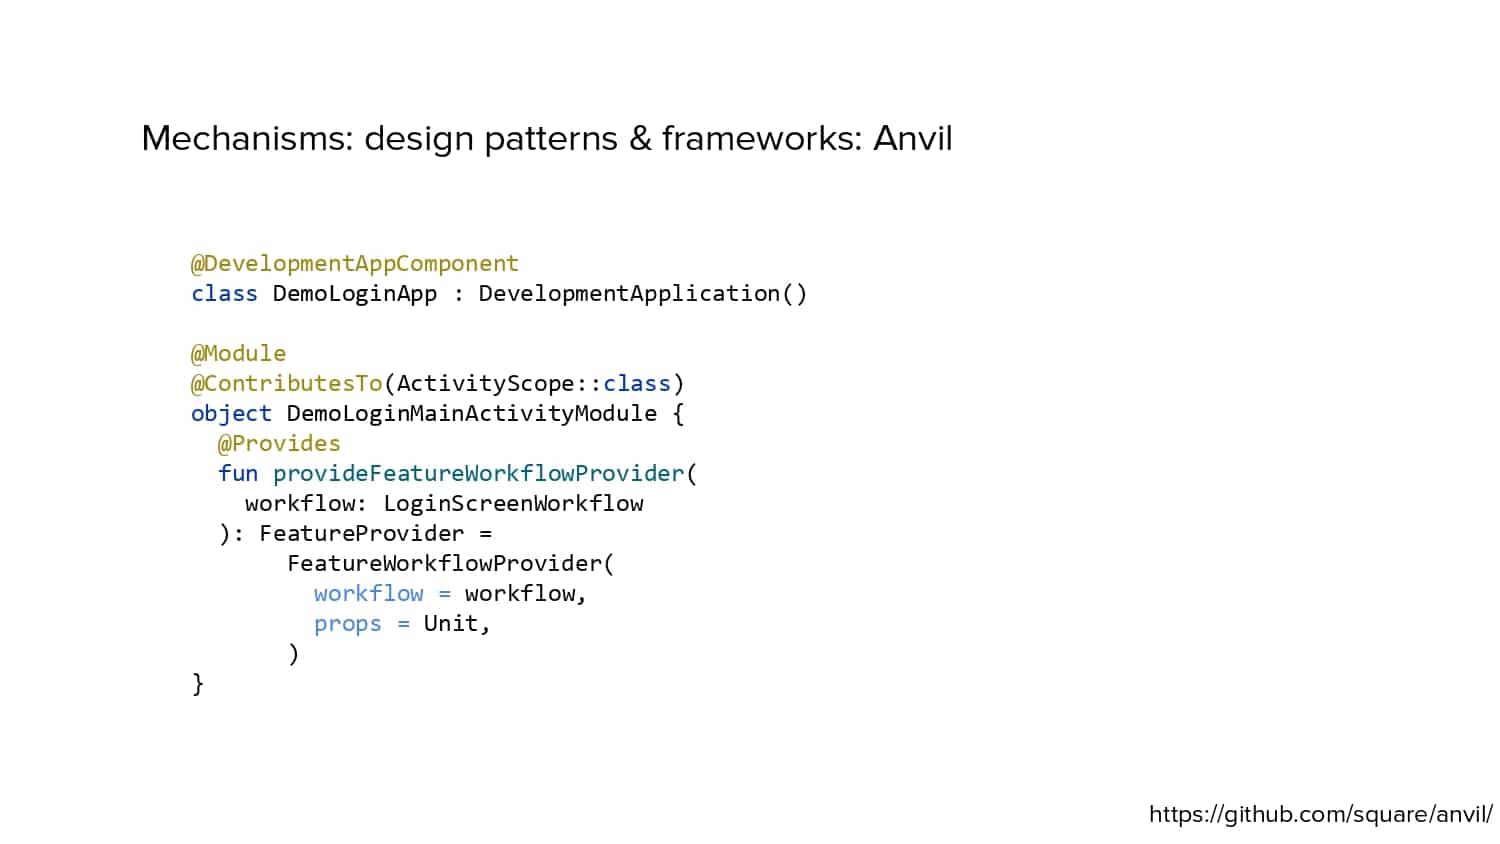
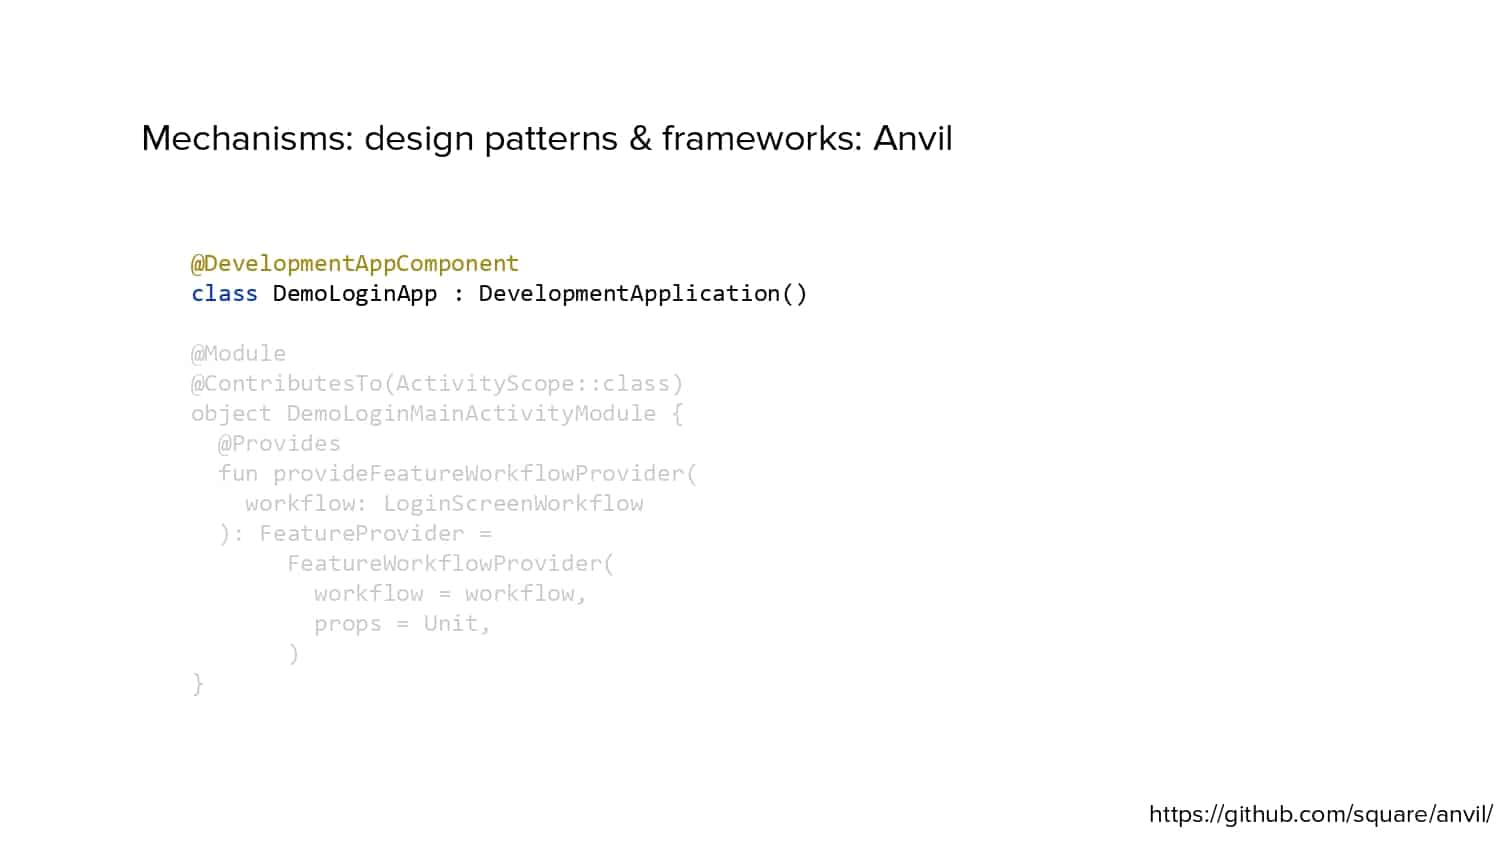
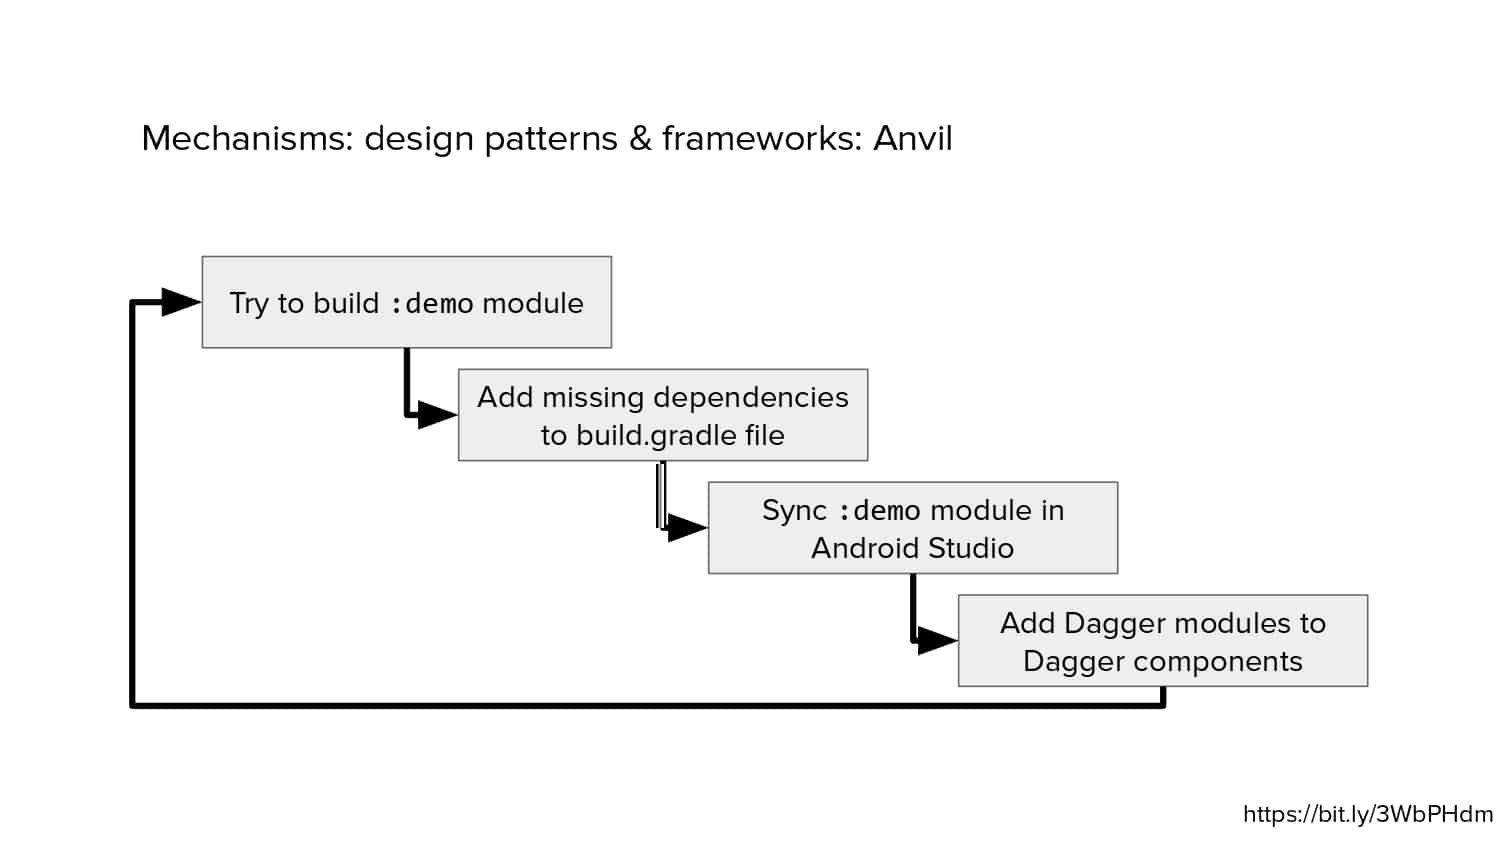
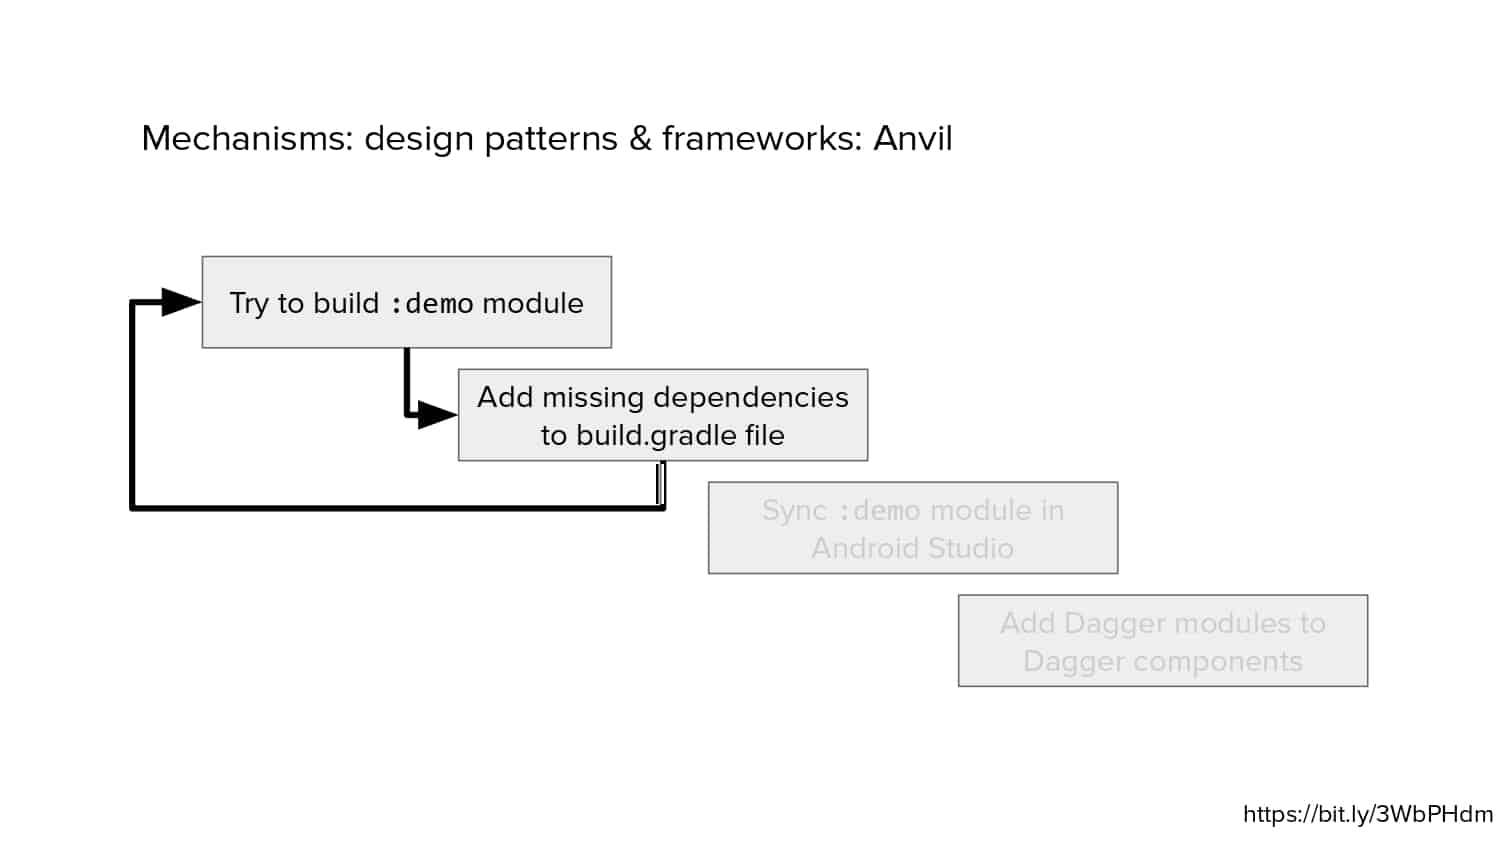
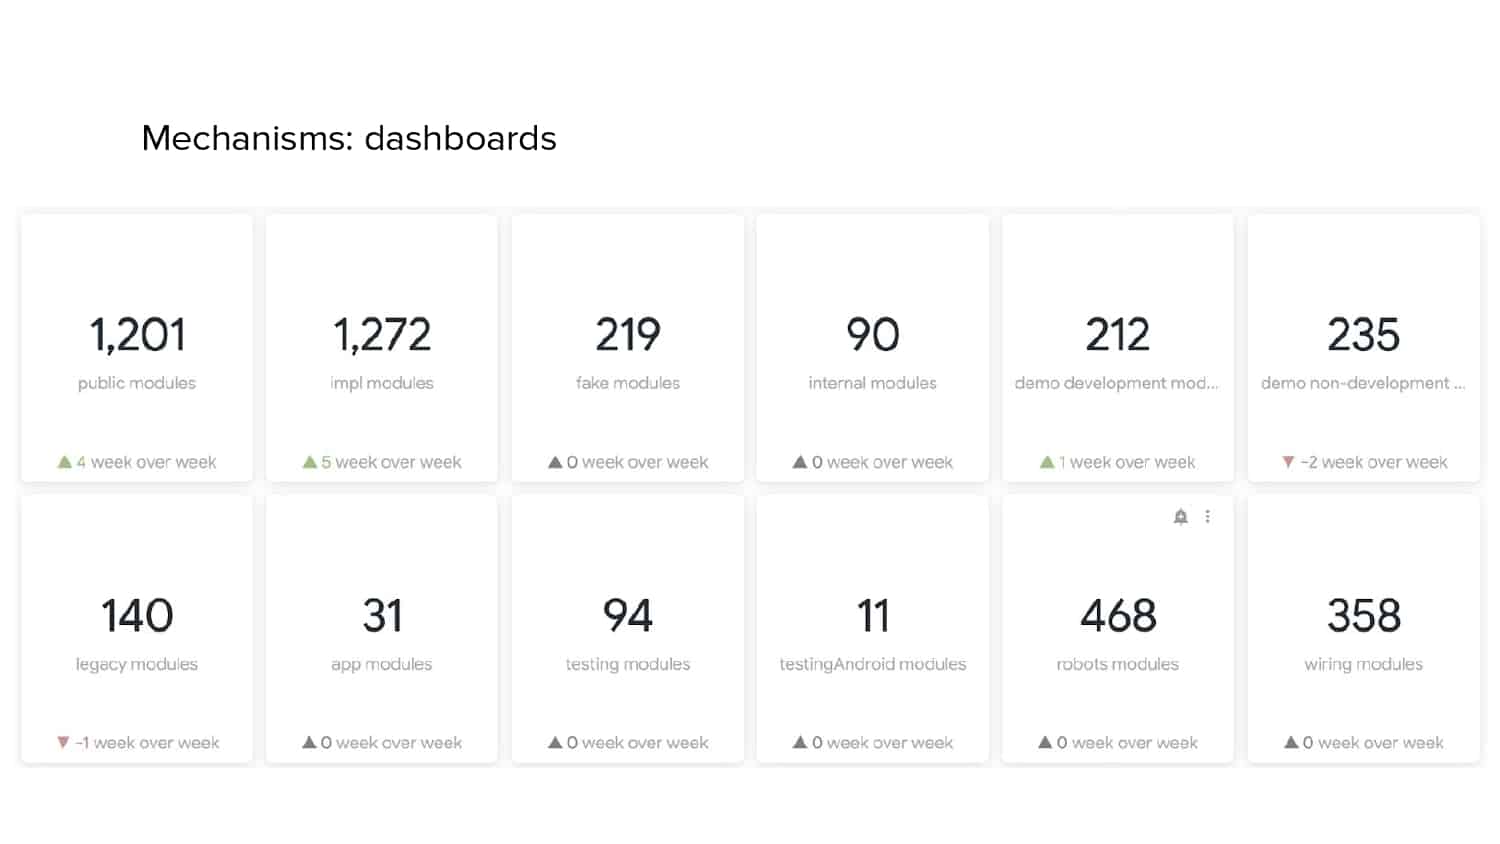
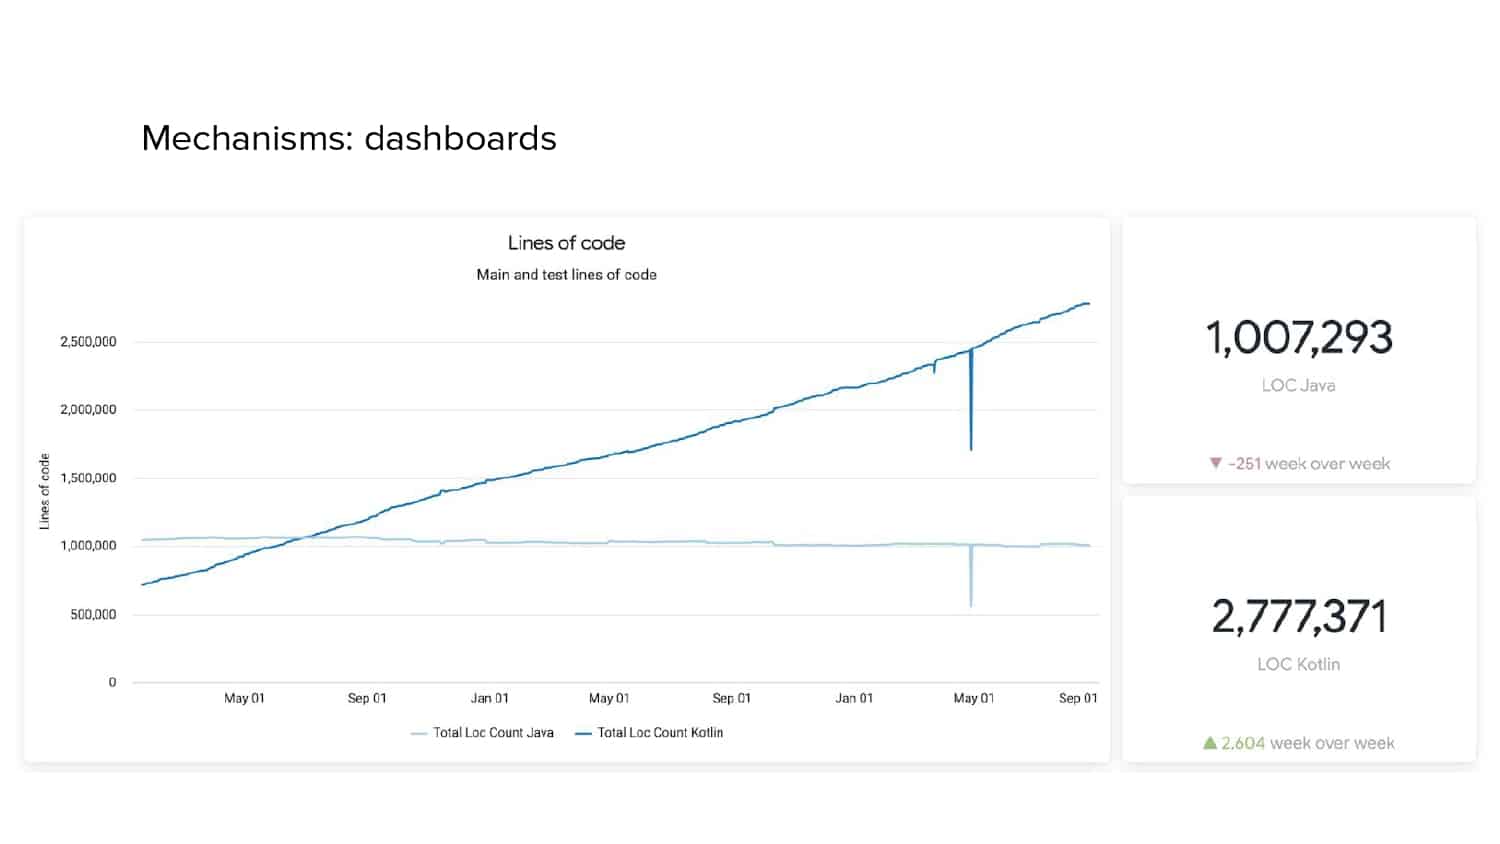
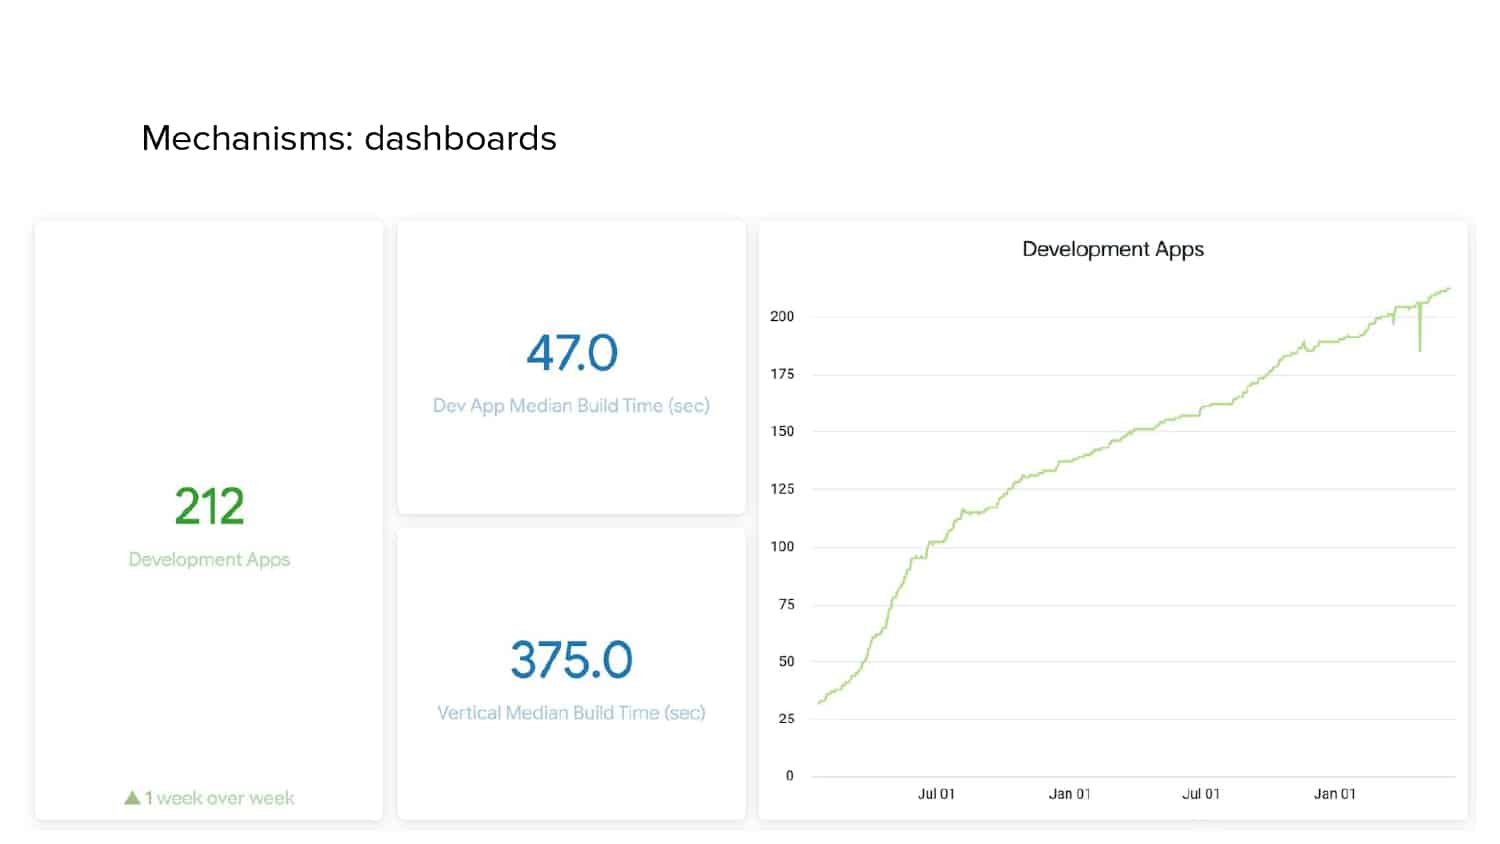
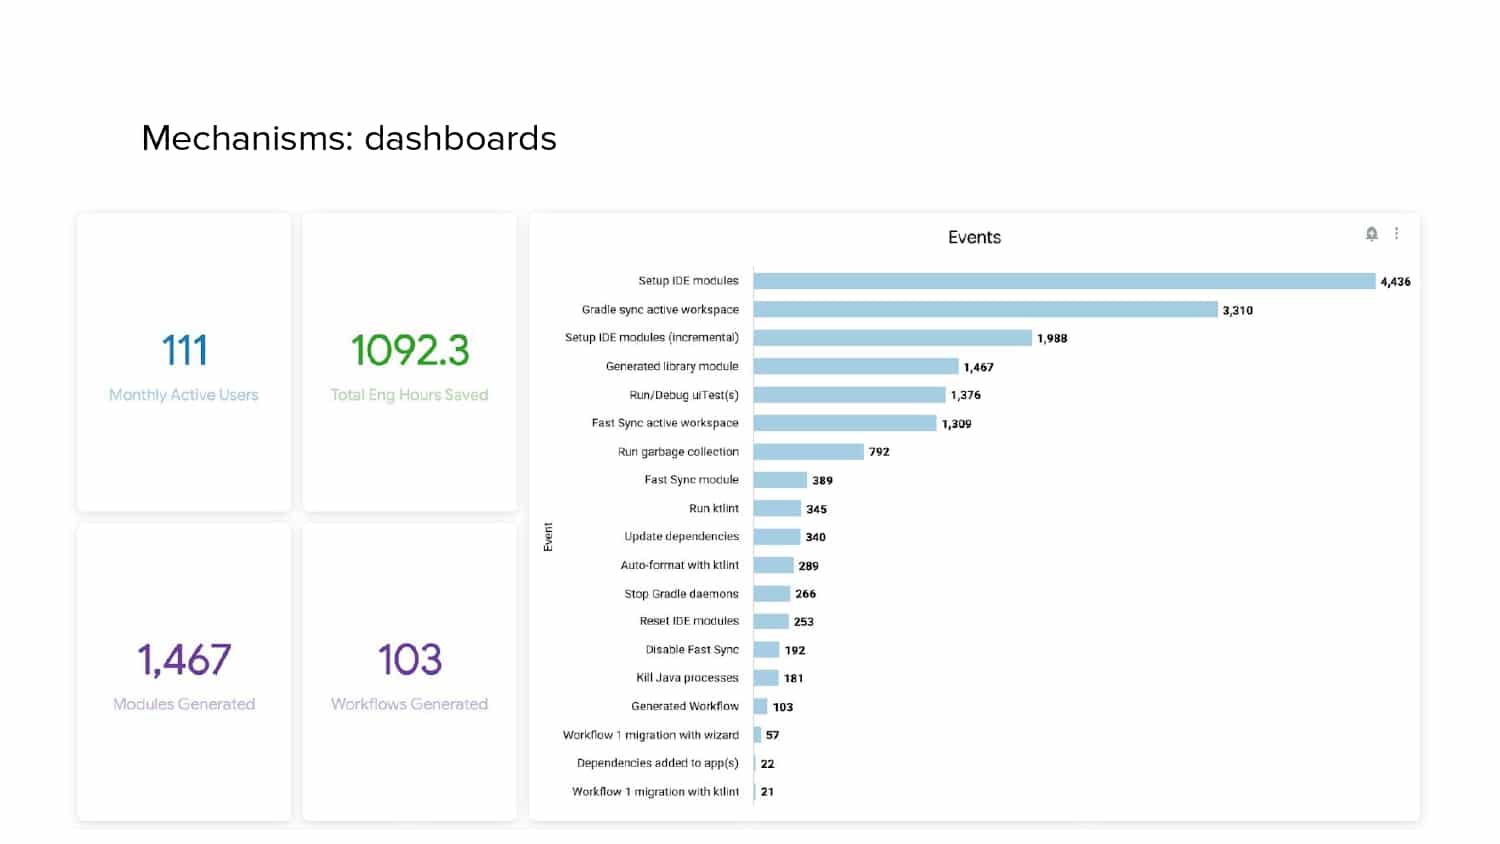
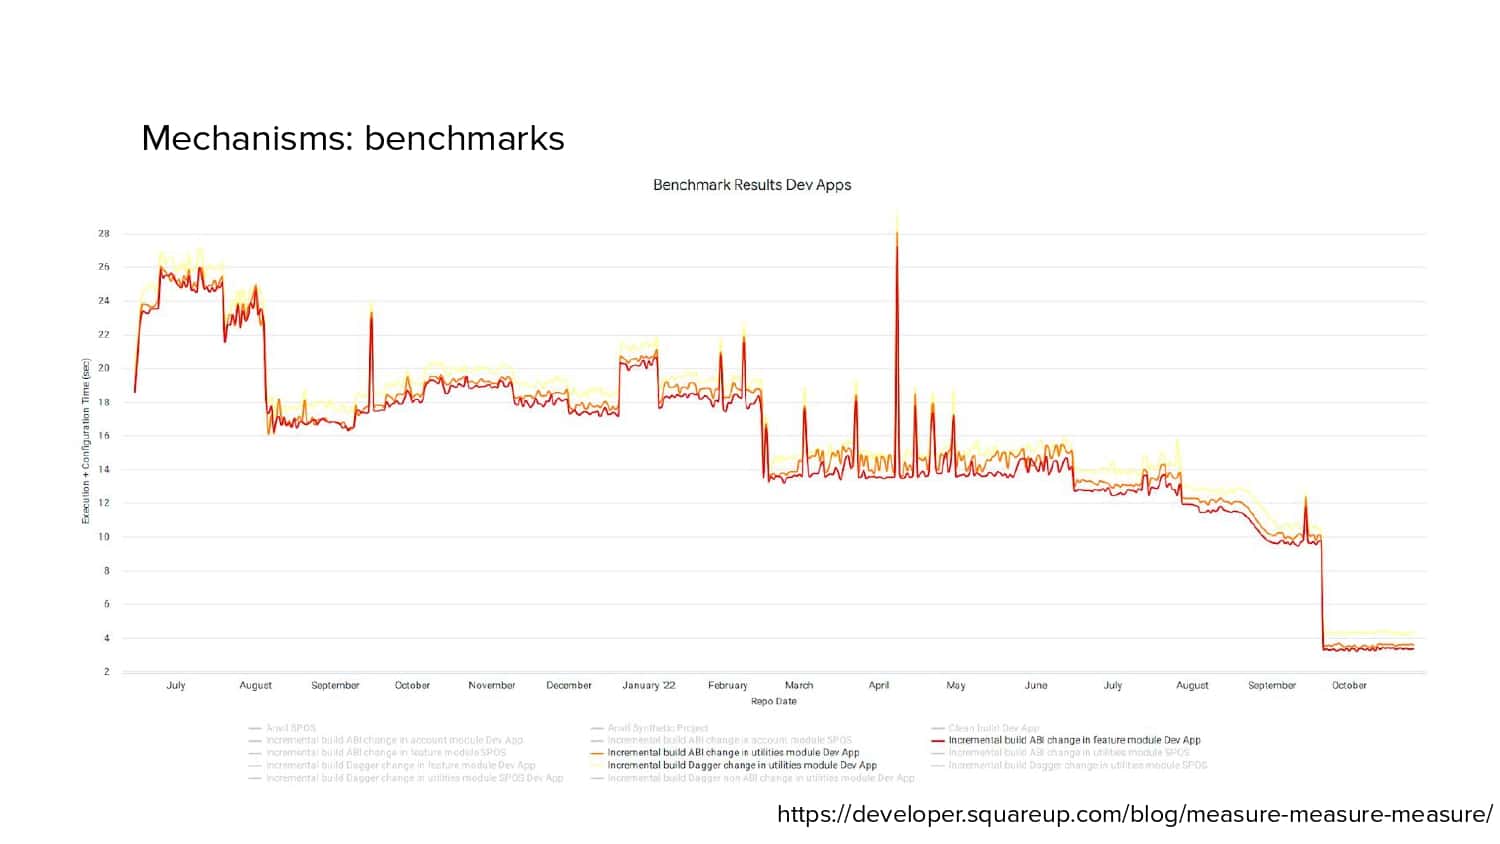
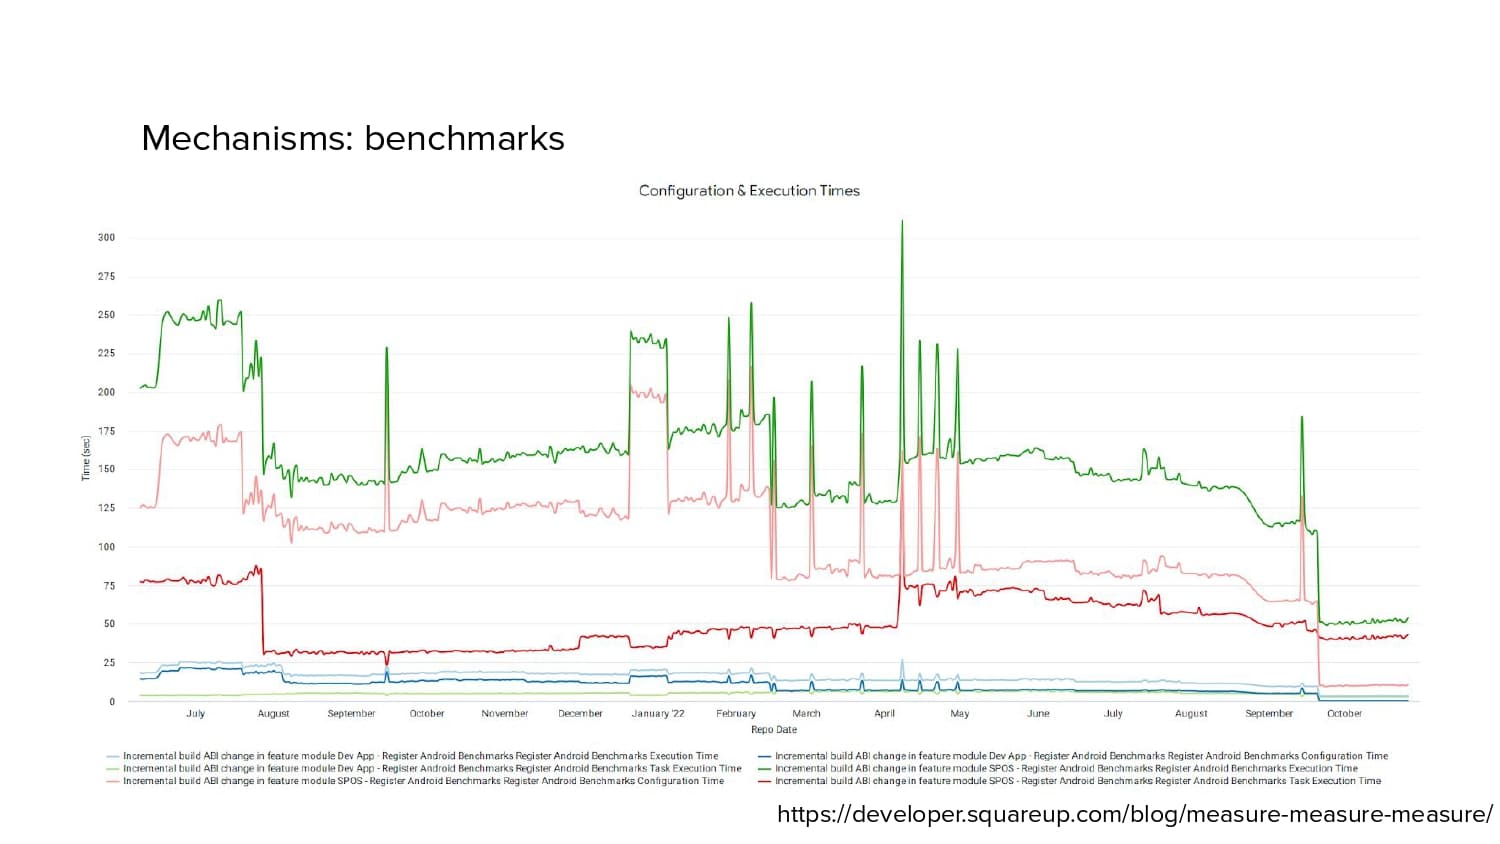
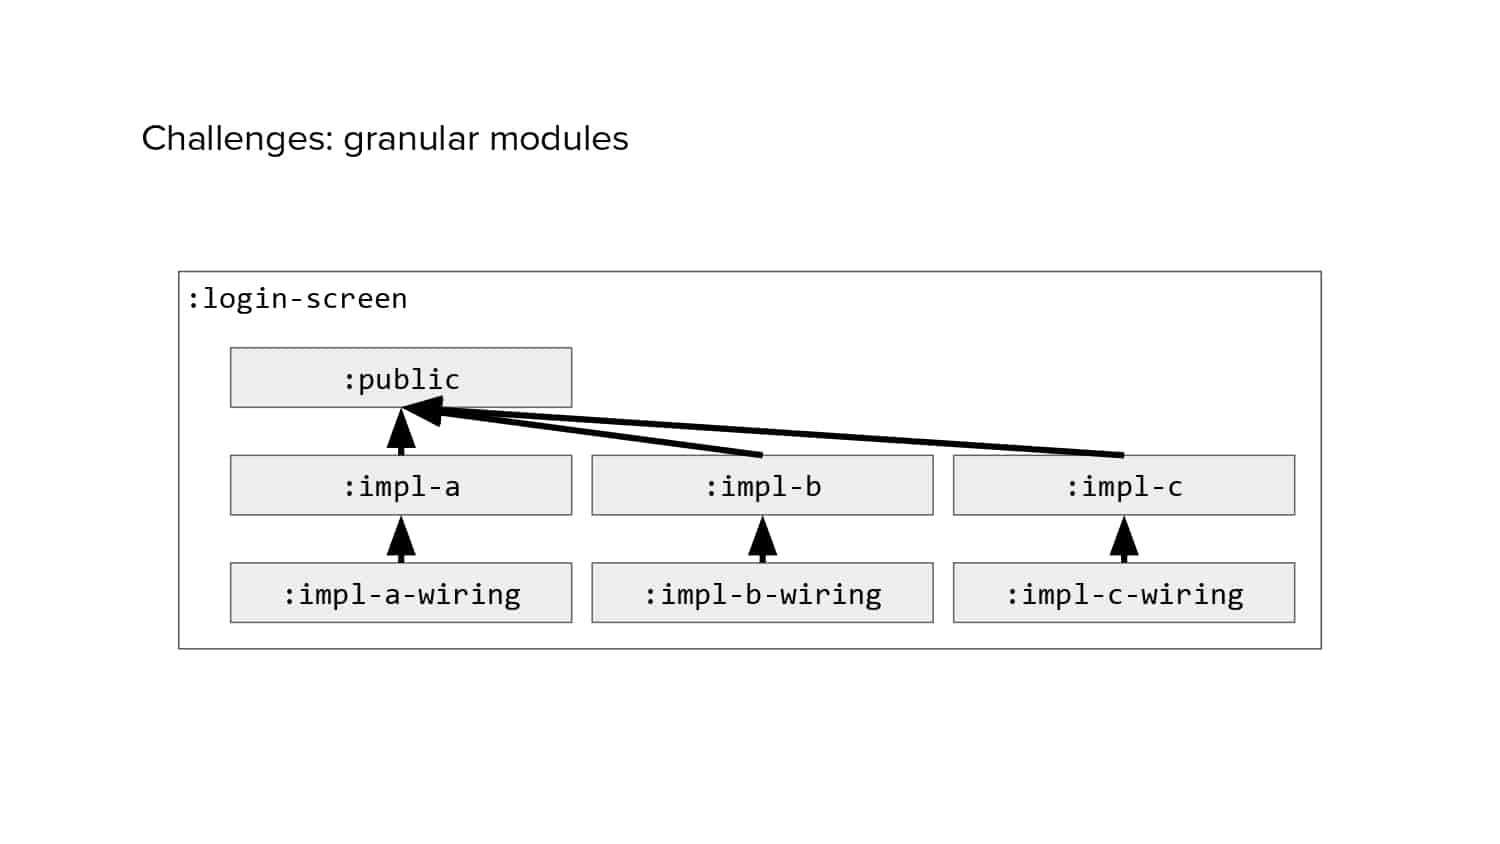
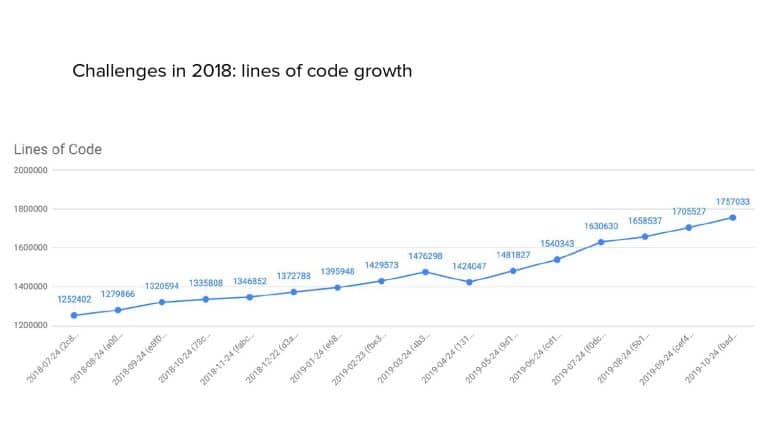
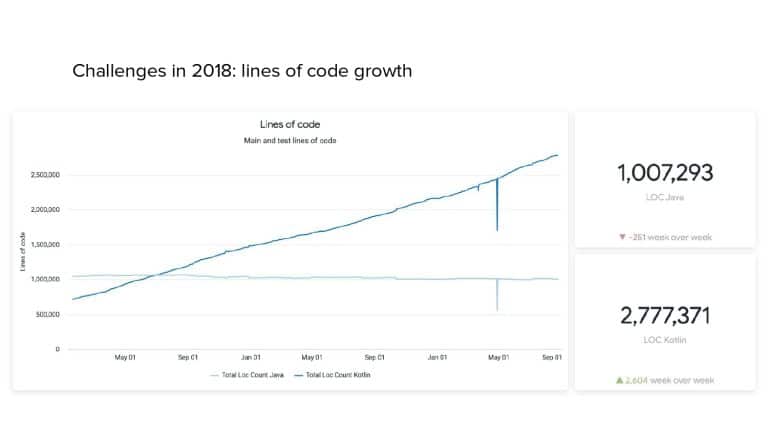
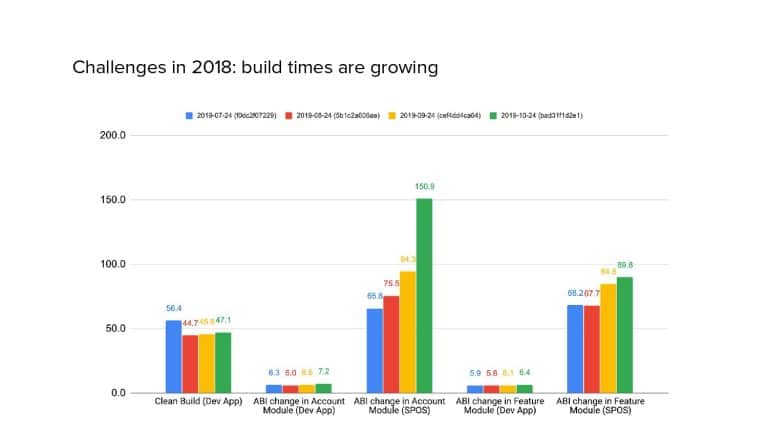
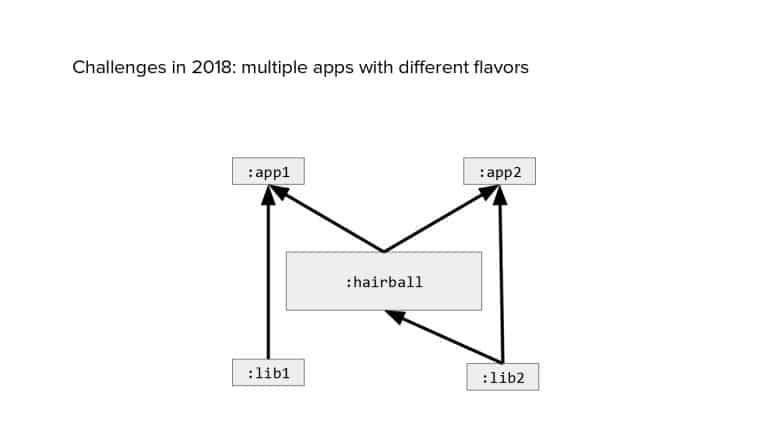
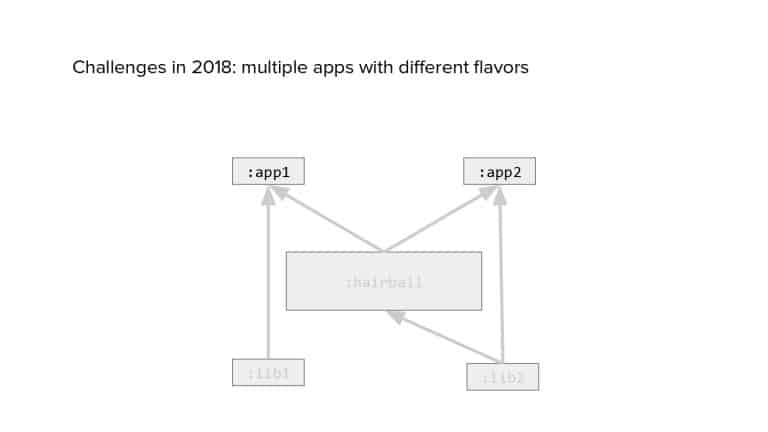
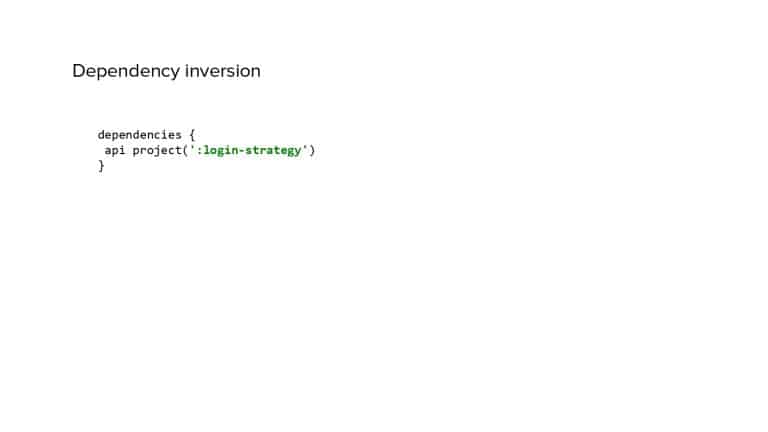
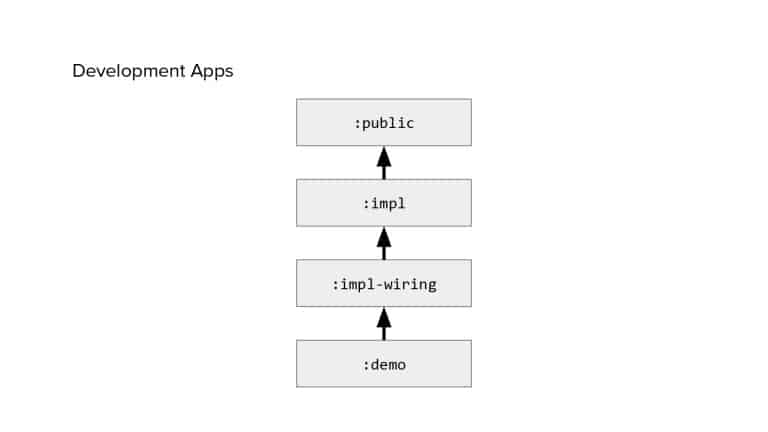
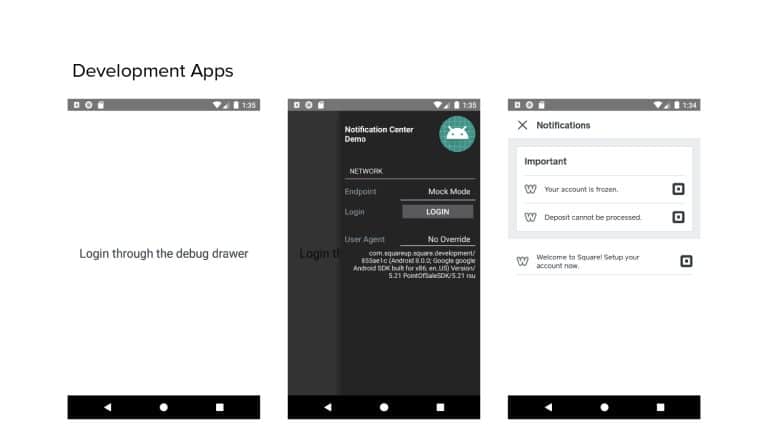
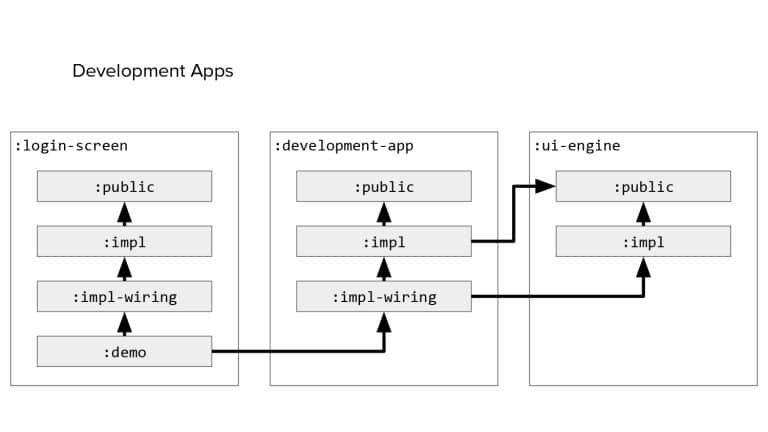
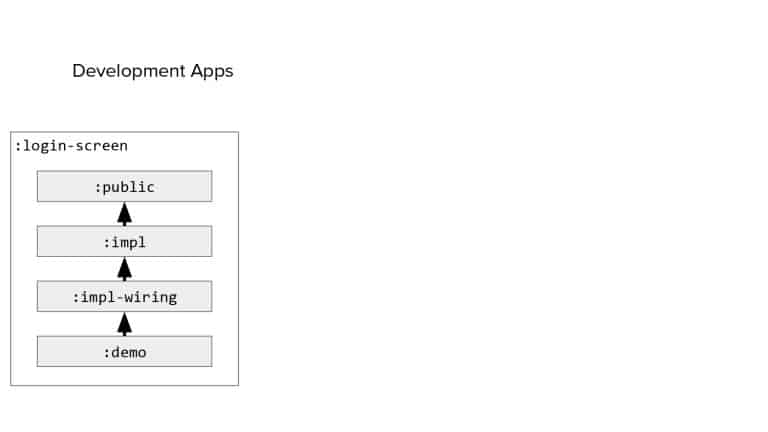
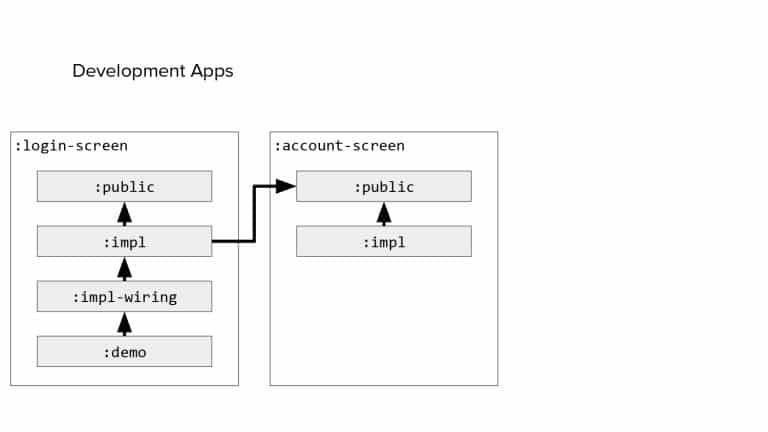
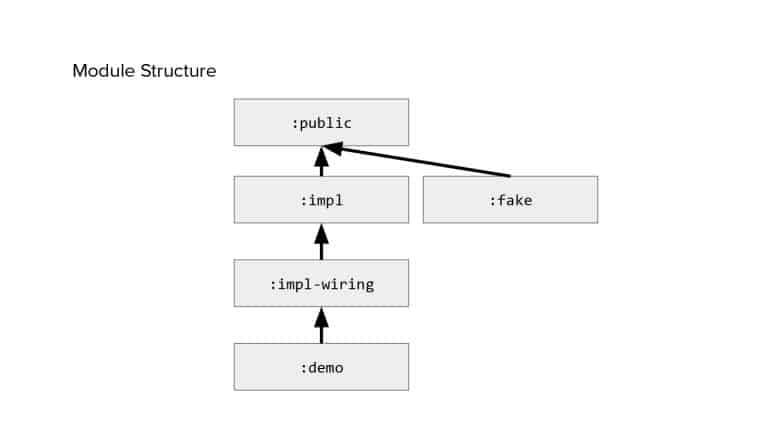
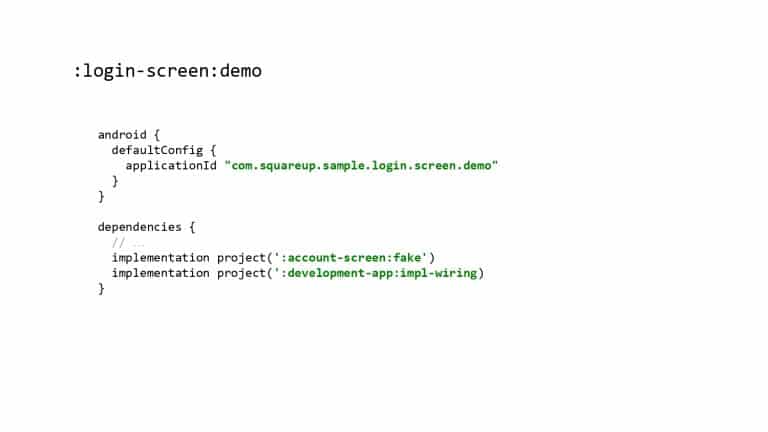
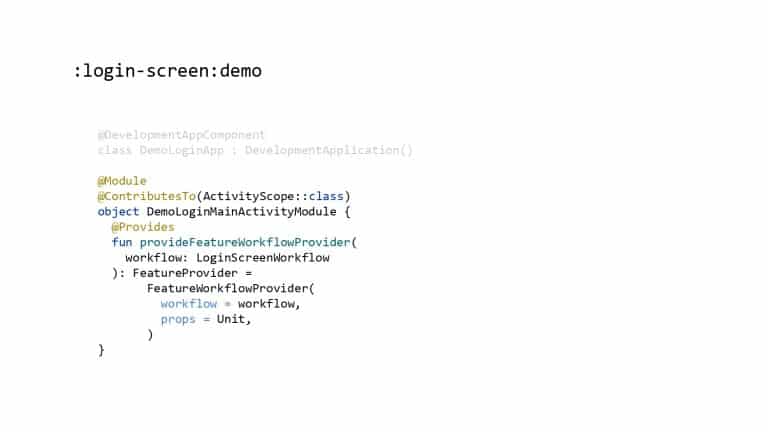
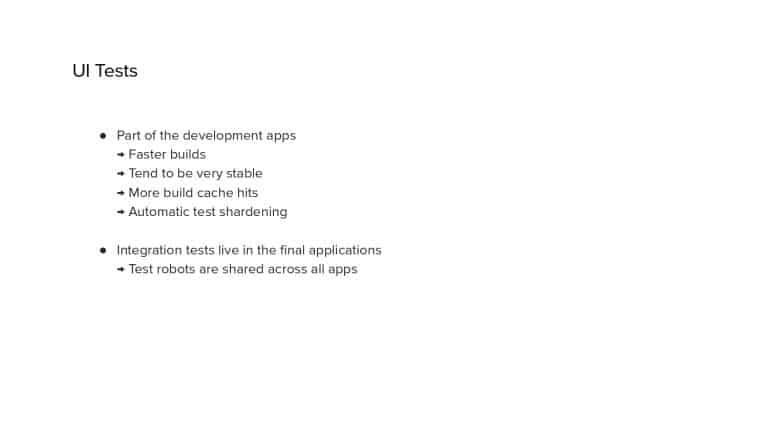
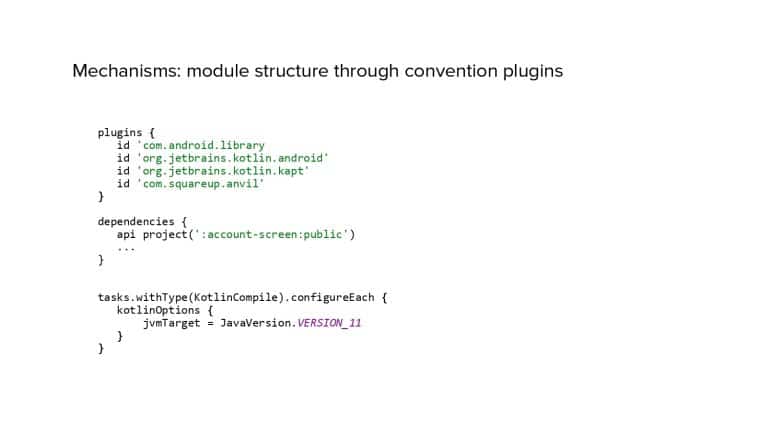
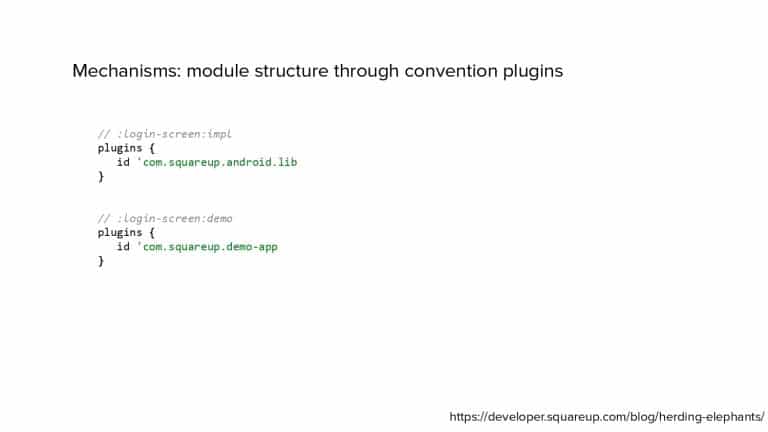
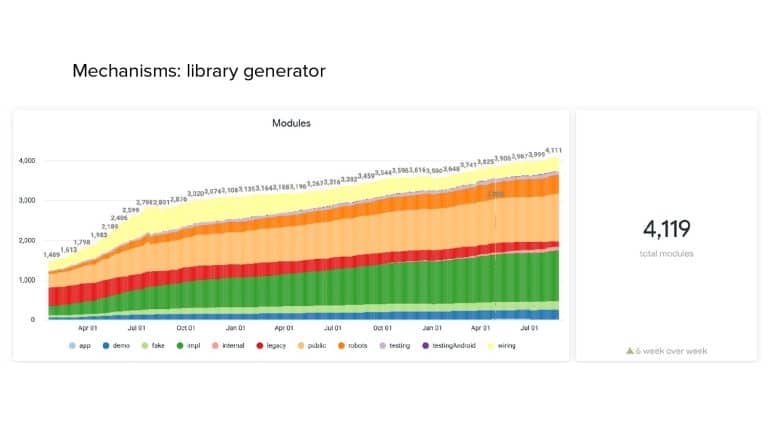
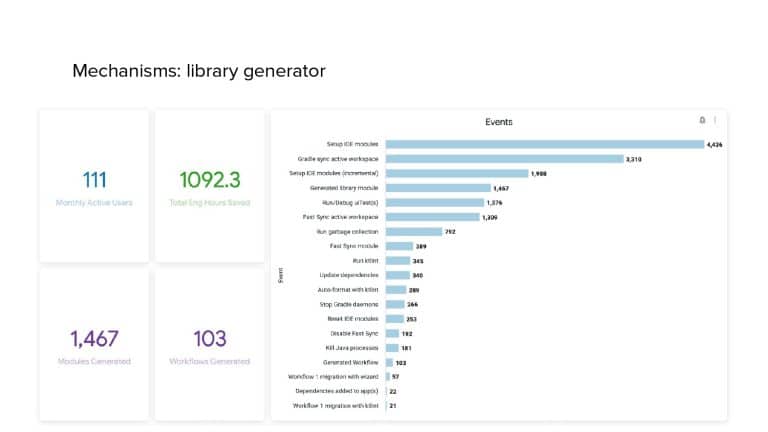
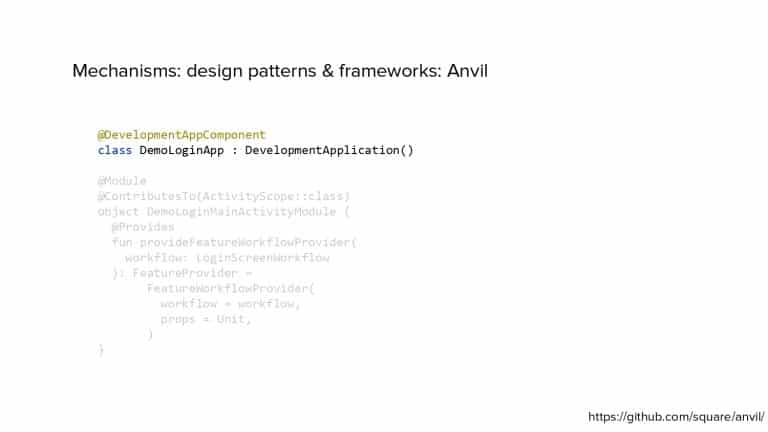
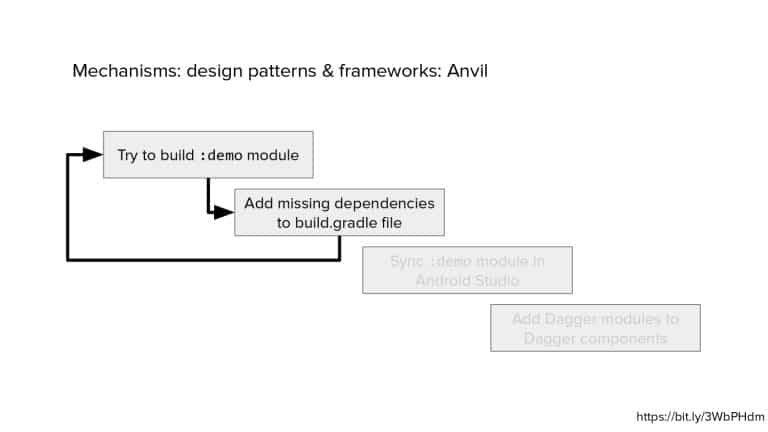
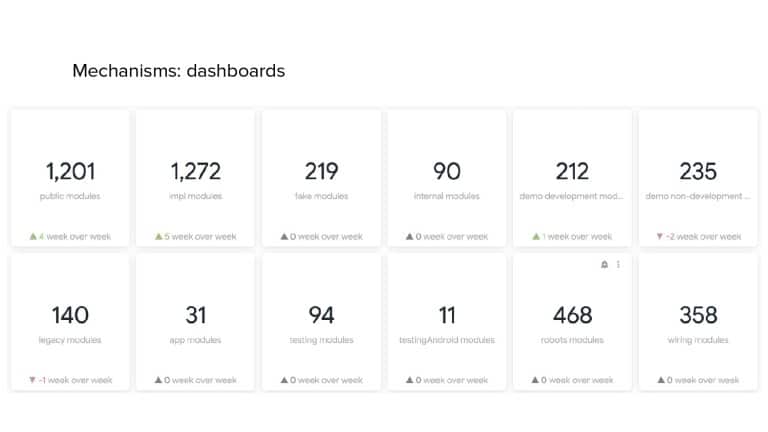
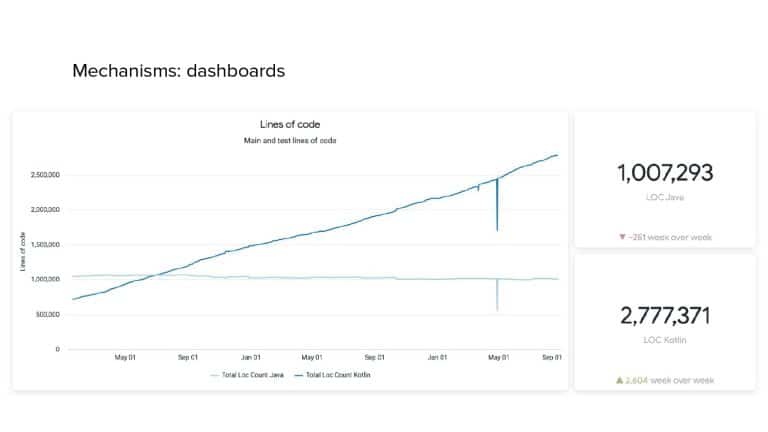
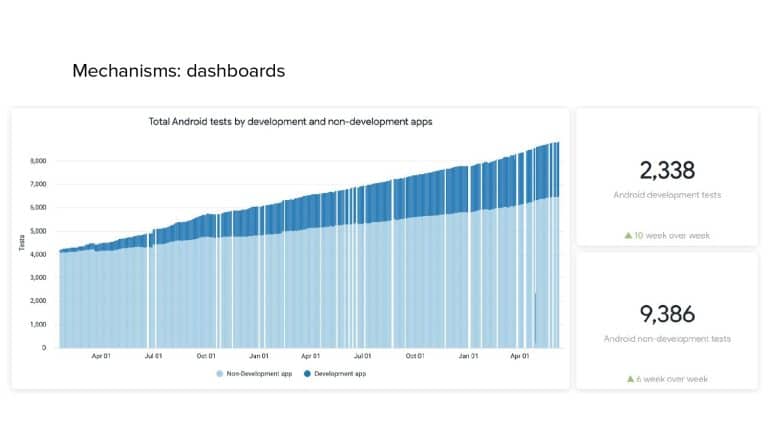
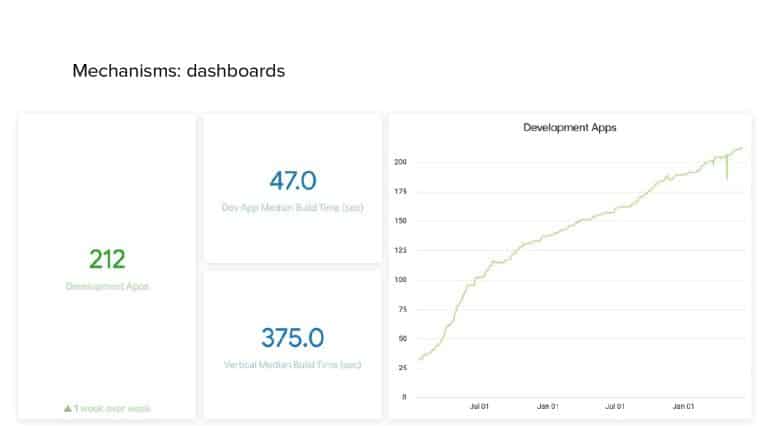
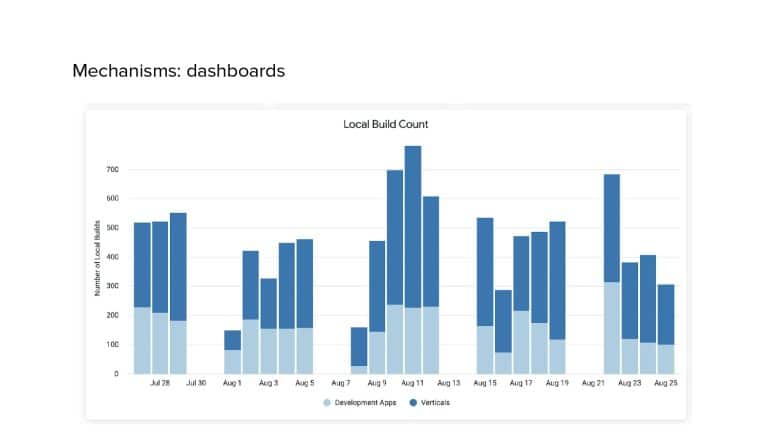
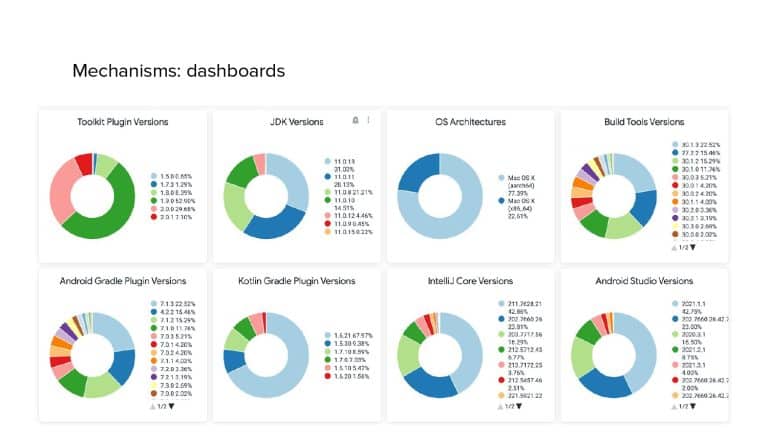
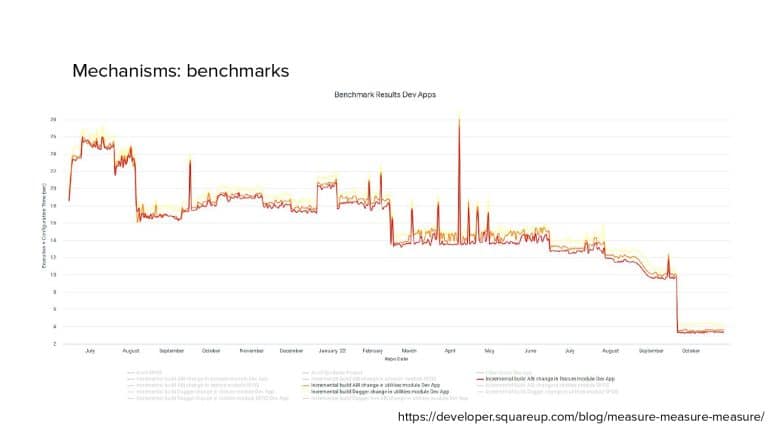
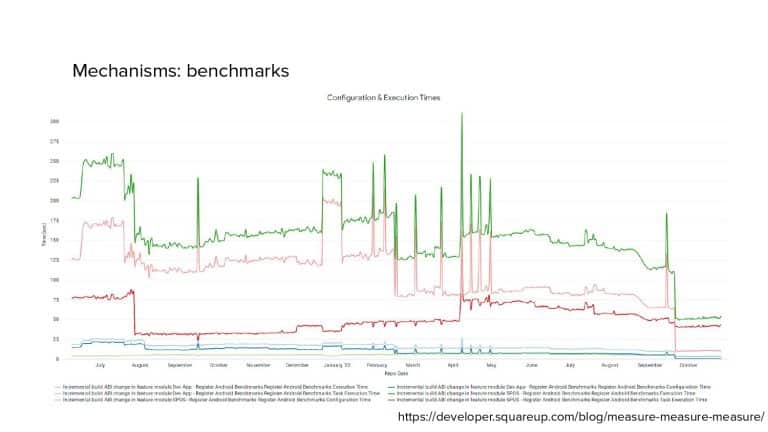
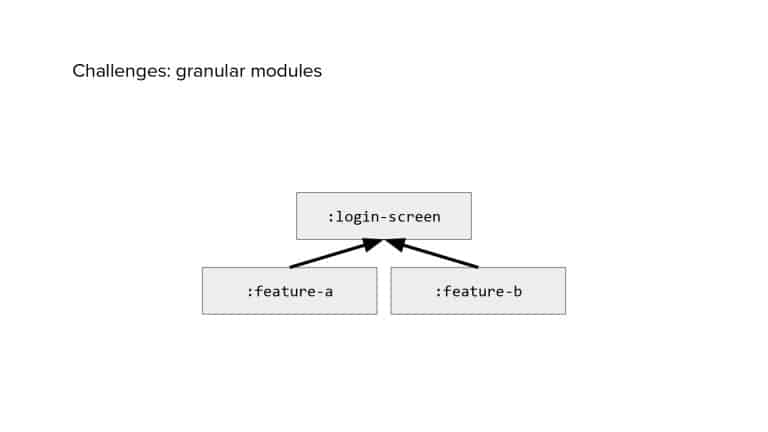
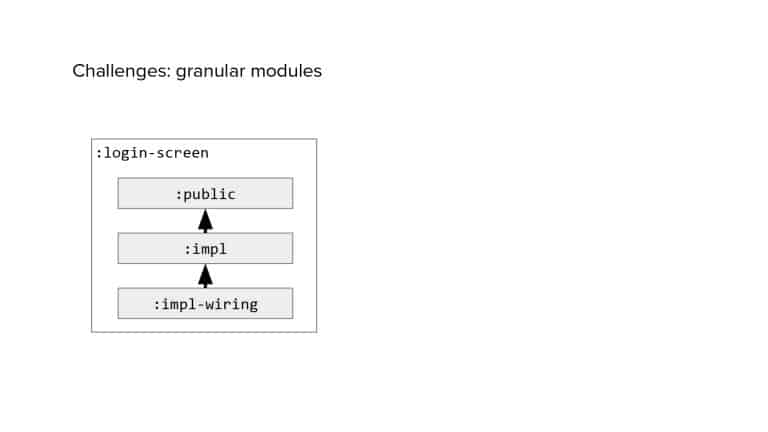
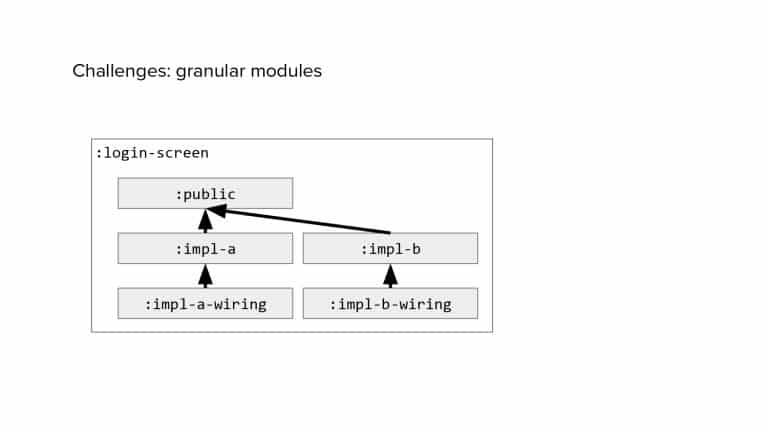
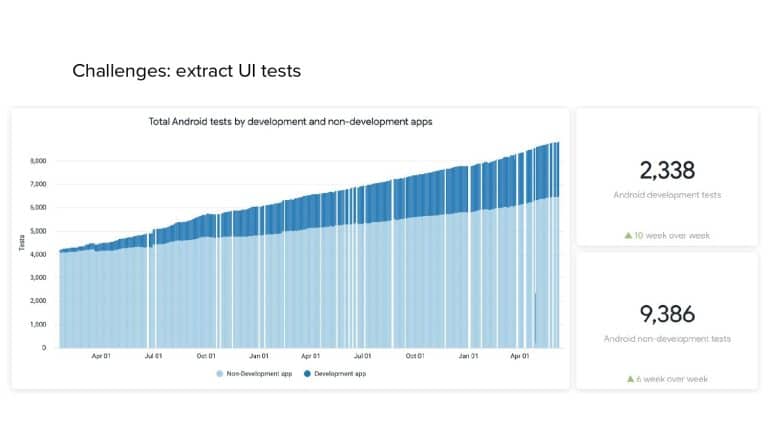
In 2018, Square predicted that their 1 million lines of code (LoC) codebase would double in size every couple of years; a prediction that came true when they reached 4 million LoC in late 2021. This growth negatively impacted build and test times for Square’s 300+ modules and 20+ applications that were all part of the same codebase. Enter Isolated Development, a practice of creating demo applications for sandboxing new features without pulling in everything from the entire application. This led to new opportunities for using DPE techniques (and Gradle Enterprise features) like build and configuration caching, test parallelization, and observability dashboards. This experience revealed more efficient workflows and actionable data for improving productivity that ultimately resulted in a 60% decrease in build and test cycle times.
Ralf Wondratschek is a Principal Engineer at Amazon (formerly at Square) who helps simplify the delivery process of millions of packages. This includes providing a platform for internal and external partners to integrate their features, shipping applications for vehicles and other form factors, and making the whole delivery process safer. Prior to joining Amazon, Ralf worked for Evernote and several companies in Germany, and he has published four apps in the Google Play Store as an independent developer.

Gradle Enterprise customers like Square use the Gradle Enterprise Build Cache to reduce build and test times by avoiding re-running code that hasn’t changed since the last successful build, and Test Distribution to further improve test times (often 90% of the entire build process) by parallelizing tests across all available infrastructure. You can learn more about these features by running a free Build Scan™ for Maven and Gradle Build Tool, watching videos, and registering for our free instructor-led Build Cache deep-dive training.
Check out these resources on keeping builds fast with Gradle Enterprise:
-
Watch our Build Scan Getting Started playlist to learn how to better optimize your builds and tests and to facilitate troubleshooting.
-
See how Test Distribution works to speed up tests in this short video.
-
Sign up for our free training class, Build Cache Deep Dive, to learn more how you can monitor the impact of code generation on build performance.
So the things that I would discuss today, you can apply this probably to any code base. It’s more high level. Before I start talking about some details, I would like to set the tone and go a little bit back in time to 2018 when I joined Square and discuss some of the challenges that we had. First, we already had quite a large code base with over 1 million lines of code and our prediction was that the code base size would double every two to three years. And to give you a sneak peek, that’s what the numbers looked like in September of this year, we were close to 4 million lines of codes. So our prediction worked quite right. With more lines of code in the same code base, build times go up. Those are some build times from 2019 and you can already see, depending on what changes you made as a developer, you had to wait quite some time until you could see the resides on your screen, on an emulator, on an Android device.
And we knew that those times would only go up so we needed to do something. Another challenge was that we already had quite some few modules in the code base, was I think 200 to 300 at that time. And we had to come up with a structure. The structure we settled with back then was something like this, which is quite common, where you have your applications, then you have some feature modules with rules like feature modules are not allowed to depend on other feature modules. Then you have some common modules, API modules that are widely shared within the code base. I’m not a fan of this structure. I think it slows you more down than it actually helps. I often bring up this example of the setting screen. Where do you put the setting screen? To me it sounds like a feature because you have lot of UI but then you want to show the settings of other features. But feature to feature dependencies aren’t allowed.
So I don’t think that’s something that gets very well. Another challenge for us was that we had multiple applications within the same code base. In fact, we had over 20 different apps that we shipped to customers. All part of the same code base, all shared some code. And this gave small challenges. To give you an idea what kind of apps we shipped, this is for example, the appointments application. Then you can see the Square reader in order to accept credit card payments that you plug into the phone. We have a terminal that’s also phone screen size device running our point of sale application. But the same application is also running on our register, which is a tablet size screen facing to the merchant. But then there’s a second screen facing to the customer. So having or managing two screens was quite a challenge and caused some differences in the code. Alright, I gave a talk about three years ago about the module structure that we settled with.
The module structure that we used was crucial in order to make isolated development work but I have much more content today. So I would quickly summarize this talk from three years ago. What we did with our module structure was implementing the dependency inversion principle. Dependency inversion means that high level modules are not allowed to depend on low level details. At the same time, low level details should only import other high level modules. In code, this looks something like this. For example, assume you have a class called feature, which has dependency on lock-in strategy. Here we already inverted the dependency by only having interface named lock-in strategy and then a concrete implementation maybe called SMS lock-in strategy. The reality looks more like this, where the real implementation has several other dependencies and also usually those dependencies reflect in your build files where you have dependencies to other modules in your build path.
By inverting the dependency and only depending on the interface rather than the real implementation, we actually reduce the size of our dependency graph and this gives us a flatter hierarchy and also faster builds. That’s what we reflected in our module structure. We have a public module which usually contains the APIs of your library. We have an implement module which contains the concrete implementations and then a wiring module. A wiring module has two use cases, for one we tie concrete implementations to their APIs. For that we leverage Dagger and usually, so Dagger modules in our case went into the wiring modules. And the second use case is that we sometimes want to hard code dependencies and that’s what we do with wiring modules. So going back to our example, in case of our lock-in strategy, it looked more like this. So we had the folder for the lock-in strategy and then within that three different modules and in Gradle terms, it would look something this.
The reality unfortunately was more complicated than this. We had way more module types but all of them had a specific use case and we actually see some of them today during the talk and why they were helpful. The most important rule that you have to understand that is important for this talk is that we didn’t allow implement to implement dependencies. And that goes back to the dependency inversion principle. Implement modules were allowed to depend on other public modules the same way public modules can import other public modules but implement to implement, that’s forbidden and that was crucial.
Alright, in this talk three years ago, I briefly touched upon development apps and that’s something I would like to go into deeper today. Development apps was a new module type that we introduced. We called it demo. And the idea was to run features in isolation in a sandbox environment and in practice it looked something like this where you had a login screen, that was part of the development commonly shared library code base. And then after you would log in, you would see the feature that you as a developer are working on on the screen. And what development apps gave us was much shorter build times, obviously, because you would only build one feature and build an application and install this on the device. And the other thing also, you would launch into the feature directly. Think of large applications and you’re working on a particular screen when you launch the app, sometimes you have to navigate through 20 different screens before you reach the screen that you actually care about.
Another benefit that we saw with development apps, that it was a lot easier to experiment with new prototypes and you could actually merge those prototypes into the code base without being concerned that you could break the production app because well, you didn’t merge anything into production app. Those new prototypes weren’t included. Instead, you would use the demo application to show something on the screen that you then can also show the designer on your team, for example.
Going back to our example and I want to walk you through a little bit how this look like in practice. Let’s assume we have our login screen that we are working on that we want to develop. Usually in our setup, we had a public module where we described the API, an implement module and that’s where we actually write the code that we want to share and that we then also later want to integrate in our applications, the wiring module, like I said and then there’s the demo application that we actually use for development. All of our demo applications had the dependency on this commonly shared library called Development AppShare that, like I said, it contains the infrastructure to make development apps work, like it contain the network stack. It contain, for example, the UI engine that makes actually our models being rendered on the screen.
Here’s one of the use case I mentioned earlier. Here we actually have a wiring dependency to another implement module. Remember I said earlier, implement to implement is forbidden but wiring dependency sometimes need to make an exception there. It’s a rare use case but here’s very valid because we want to bundle and hard code some dependencies in order to make developments easier to work with. Alright. And then it happens that our login screen has a dependency on another library, let’s say the account screen after the user logs in. We want to show the account screen so that the user can fill in more details. And at this point I think it makes sense to discuss a little bit how we rendered screens and how our navigation system works. For that we leveraged our in-house library called workflows. IOS had the equivalent library also workflows.
They followed the same principles. So that worked quite well for us. What you need to understand about workflows, workflow is pretty much a state machine. It has some inputs, some outputs and rendering type and there are 20 different other libraries out there that do similar things. So it’s not really important but that’s the main concept. What we did is we introduced interfaces for our screens. In our account screen module, we would create an interface called Account Screen Workflow, which specifies the types, what inputs and outputs are and we put this into the public module that is being shared with other libraries. The real account screen workflow would go into the implementation module and then that’s where we would add other dependencies and so on. Now that we have that, we can go back to our login screen module, the screen that we are actually working on and we apply the same principle there.
We create a login screen workflow that goes into the public module and then we create our rear login screen workflow within the implement module. And here you can see that we actually import the public module from the account screen module in order to reference our account screen workflow. And here we inject the account screen workflow and then later the workflow APIs have mechanisms to show this screen and render this screen instead after we finished our login. Going back to our example again, that’s where we see that our implementation module has this dependency on the public module in order to reuse this functionality. If we would now try to build the demo application, we will get a build error because our login screen references the account screen but there’s nothing that fulfills this contract. There’s no implementation part of our dependency graph. But we need to run some code after after login.
The easy way to fix this is to add the dependency from our demo module to the implementation module but that would also mean we bring in way more other dependencies because our rear account screen workflow has other dependencies on other libraries. So we would go down the repertoire to fulfill their dependencies and we would actually defeat the purpose of development apps. We would bring in way more features than we needed to and actually we only care about our login screen. So what we did instead is we relied heavily on fakes. And this would look something like this where we would implement a fake account screen workflow and which has no other dependencies. And the benefit here is that we break the dependency graph.
Instead of bringing in hundreds of other dependencies, we stop here. And for our development app, we actually don’t care about the account screen workflow, that we develop our login screen workflow. We just have to fulfill the contract that something is there that implements the API. So fake where that important that we made it another module type in our hierarchy, they functioned very similar to implement modules in the end but there there were some slight differences.
The build file of a demo module was tiny. Usually you would just specify the dependencies as a developer. The source code and the demo module was also very little. Again, we’ve written all of our code in the implement module because that’s the code we wanted to actually share and then later integrate into our main applications. Often enough there were only two classes in a development app. That’s a development application class, if you are an Android developer, you probably know every app has an application class. And then we needed to provide the workflow. In this case, we say after the user logs in our demo app, in the infrastructure, please show the login screen workflow. And that’s it. Later we realized and that over the years that we were working on isolated development and development apps, UI tests could actually benefit from the same things that development apps provide us.
And when I run a UI test, I also want to have fast builds. I want to iterate quickly when I go through all the error cases that could potentially happen on my screen, I want to iterate quickly for them. We later decided to move also our UI test that cover this feature into those demo apps. And the reason why we did this is well, for the same benefits, we get those faster builds. It also turned out that the tests within demo apps tend to be more stable. We want to test one feature and all other feature dependencies are replaced by fakes and those fakes are usually stated. For example, if you would bring in a real implementation of another feature, this feature might be flaky and then it would cause flakes within your test. By using fakes, we avoided this problem.
We also saw more big caches again, by depending on fakes and breaking the dependency graph and making it shorter. If somebody adds, modifies another feature, it wouldn’t impact our demo application. We would get a build cache that would also mean we wouldn’t need to rerun test for example, NCI because we knew that they would be green. There were no changes. And on top of that we got automatic test shortening. We had over 200 development applications in the end in our code base and you could build all of them in parallel. You can then also launch 200 emulators and run all of those tests in parallel. That was a nice benefit we’ve seen in CI. In the end, you still had to write some integration tests and that’s when you decided that your feature is ready and it can now be included in your main applications and you want to ship those features to customers.
And usually we wrote one or two happy path tests just to make sure that the feature actually launches in the main app. To avoid any code duplication, we heavily relied on test robots. Test robots is a paradigm to navigate through screens and make certain assertions that the correct UI and the correct content is shown. If you search for test robots you find a couple of talks or blog posts about this paradigm.
All right. Now that you have a rough idea of what developments are, I would like to walk you through some of the mechanisms that we used in order to make isolated developments successful. First of all, we had to implement our module structure. And when you deal with hundreds and then later in our case with thousands of modules, this becomes quite tedious. If you want to make a change, you can’t open 200 or 2000 build or Gradle files and make code changes. This is tedious. So I started initially with a shared build file that I included in every module but this did quite poorly and later another team rewrote this shared build file into convention plug-ins. I’m sure that’s a Gradle convention. We will hear more about convention plug-ins. But the concept is that you move all your build logic into a custom Gradle plug-in and our build files then later reduced to something like to this where we just would apply our convention plug-in and that’s it. At the bottom, I linked a blog post from our partner team that developed those convention plug-ins. If you want to know more about it please take a look at that.
Then we had certain rules in our module structure like I mentioned. Implement to implement dependencies are forbidden or public modules are not allowed to depend on implementation modules. We had to implement some link route. Initially, I thought, “Well, those routes are obvious. They make so much sense of… Why would anyone do something else?” Well, I learned this lesson quickly that there were violations in our code base and we had to implement custom link routes for that. We haven’t even relied, for example, on… when we had custom link checks within a module but across modules we relied on Gradle tasks and implemented the link routes those way, those weren’t really complicated.
One of the biggest wins for us that made our module structure successful was probably the library generator. This started initially as a CI tool and then later one of our interns has rewritten this as a plugin for Android Studio and IntelliJ. I’ve shown you the diagram earlier. We have quite a few modules and relying on the wizards that are built within Android studio didn’t really work well. Imagine you wanted to create a new library. You would right click, create a new module and then you would start maybe with the public module. You would need to update your build files, to apply our convention plugins, for example then you would open the wizard again to generate the implement module and so on and so forth. That’s tedious. This custom plugin generates all the boiler plate. It generates the photo structure of your new library, for example, that’s the owner but it also generates some sample codes to help developers to get started easier and to know where they need to place interfaces, where the rear implementations belong and so on.
Everyone got the message. And we actually… One, two, three. Oh, perfect.
We actually saw the benefit of the library generator in our statistics. So if you look at the beginning, I hope you can read it. Yeah, can barely read it. It says that we initially had about 1400 modules and then we quickly went up to 2,700 modules and that was because the library generator was so easy to use. Developers understood the concept of the rules that we had, that implement to implement dependencies aren’t allowed. And to a share code, they would need to rely on the public module. And they just used the tool. We never asked them to adopt a module structure. They just did. And the tool, again, made it very easy for them to get started. Here’s another graphic where we can see that that’s some statistics about the IDE plugin that we maintain. Using the library generator was the fourth most commonly used action within this plugin.
And then we relied heavily on certain design patterns and frameworks. For one, we relied on workflow to compose our screens. And here workflow, again, you can use any other library but the key here was for us that workflows are… You can use composition in order to combine multiple workflows and render subtrees. So that was key for us because you could take out any workflow of the main application, put it in this sandbox environment, what our development app share was, then run this feature in isolation. Dependency inversion was crucial, like I said earlier and we implemented this through our module structure. And then the first pattern that had a big benefit was dependency injection. I know on the Android side there’s always this debate, which dependency injection framework is the best. We heavily relied on Dagger and I wouldn’t do so any other way.
And on top of that, we built our own framework called Anvil to make Dagger a little bit easier. And they had a huge impact. That’s why I would like to briefly touch upon that. If you had a class like this rear login screen workflow that lives in the implement module, you had to make… Tell Dagger… That’s the way Dagger works. That whenever you inject login screen workflow, you would get this rear login screen workflow implementation. And with Dagger, you do this by creating a new module. And those modules in our case belonged into the implement variant module. And then later, you had to add this Dagger module to the Dagger components. And each application in our case had its own Dagger components. So 20 apps within the same code base. You had to touch and modify 20 different apps just to include one Dagger module. Obviously it didn’t scale. Then after we introduced development applications, imagine updating 200 modules that didn’t really work.
We solved this by introducing Anvil and which provides us a single annotation to make sure that whenever you ask for a login screen workflow, you would get the real login screen workflow implementation and the other thing is combined at compile time. Another benefit was that Anvil was extensible and we wrote some custom code generators for our code base. We didn’t open source this because it really applied only to us. For example, this development app component annotation generated a bunch of code that we couldn’t share through libraries. So instead we generated this code on demand in the demo apps. For example, in this particular case, it would generate the Dagger components. So that saved us thousands and thousands of lines of code. And with the other code generation for binding implementations, we were even able to delete wiring modules entirely. They became redundant. So that was a big win for us. In June this year, I gave a talk about Anvil with Gabriel Peal. So if you want to learn more about Anvil, I such suggest taking a look at that.
But the real reason why we initially developed Anvil was that we had this weird cycle when developers wanted to create a new development app and it was quite tedious to set up a new demo application and we wanted them to adopt this principle. So we had to do something about it. So what initially happened was that a developer would generate a new demo module through the library generator. Then they would make sure that they would launch their workflow after the user… After they log in through the demo application. And then they would try to build this application and they usually would get the build file. Usually it was something along the line, dependency is missing for Dagger. Dagger would verify your dependency graph and usually something was missing that you try to uncheck. So developers would update the build.gradle file at the dependency, for example, through a fake implementation.
Then they would need to sync the demo module in Android Studio. And that was one of the longest running tasks because for a while sync times in Android Studio were quite bad. And the more modules they have, the worse it gets. So every time you change the single line in the build file, you had to sync thousands of modules for us because there was no incremental sync, there was no parallel sync. So that was quite painful. And after all of that, you had to add the Dagger module that you just imported through the fake implementation to the Dagger component of your demo module. And then you would go back and start this whole process over again. And you can see that this is tedious. And by leveraging Anvil, we skipped the last step. We no longer had to manually add Dagger modules to Dagger components. And therefore we also didn’t need to sync the demo module anymore.
We aligned our build graph, our Gradle build graph with our dependency graph at runtime. And that was a big win. So in the end, developers just had to add the dependencies to the build.gradle file, try to build it and it was a lot faster process. I think this can be heavily improved with intelligent decisions. Like you can see dependencies, you can inspect them and make suggestions what should be included in a build.gradle file. But it’s something that we couldn’t do BIOS there. Another important mechanism for us was dashboards and this probably goes also back a little bit to the keynote. We had to prove that those investments are worth it. For that, we had to keep track of some of the metrics and I would like to walk you through some of them.
We also made mistakes along the way. Initially, for example, we thought that transitive dependencies was an important metric and we wanted to keep them down. But later along the way, we learned this metric doesn’t actually make sense if you want to modularize your code base, because then the number of transitive dependencies goes up. So what we measured in the end was, for example, the module count. The module count was important because, well, we had a lot of modules within the same code base and with this size, you constantly challenge your build tools, your IDE. It puts a lot of pressure on them.
So that’s something that was important to us that we had to keep track of. We also kept track of, obviously, the module types we had in the code base and especially the guy in the bottom left which is called legacy module. It was important to us because we still had some legacy modules left that didn’t adopt our module structure. And they were quite painful. So we wanted to see their number go down. We tracked the lines of code in the code base and we tried to correlate this with the module growth. So yes, developers create and write a lot of new code and often, therefore, they would also create new modules. So that seemed reasonable to us. We kept track of the UI tests. Like I mentioned earlier, we wanted to move all of our UI tests into demo apps in order for developers to iterate faster and write more tests in isolation. So we kept track of these numbers. We measured how many development apps we had. Also, their build times and especially the comparison to the main applications was important to us.
And there, we saw roughly an eight to 10x improvement. Those numbers are actually real build numbers that we collected through build scans. So that’s what gave us really an idea of what developers experience. We kept track of the build counts, how often would developers leverage, for example, demo applications versus the main applications. We collected some statistics about our IDE plugin like I mentioned earlier and yeah. One other very important mechanism that we used and created benchmarks… Dashboards for was benchmarks. Initially, we set up benchmarks to measure the difference between the demo modules and the main application. We wanted to say that, “Hey, development apps are 10x faster. Please use this in your development workflow. You’ll be much more efficient that way.” But later, we realized that, well, we could use those benchmarks for more. We could actually test and measure if Gradle or the Android Gradle plugin or Kotlin have some build time regressions and we find quite a few of them actually. For example, if you look at this green graph, in the middle towards the end, there was this particular scenario where we changed Java files and Kotlin files in our benchmark.
And there was a regression in the Kotlin plugin that we found and also reported to JetBrains and that they later then fixed as you can see. So that was a really good mechanism for us to also give feedback to the tools providers that we used. Here’s another benchmark where we measured the build time of development apps. And we see the right trend that the build time goes down. So that was nice to see. So build tools were on the right track. They were actually improving things for us. So that was good to see. I would like to call out the dip at the end where build times reduced from 10 seconds to about four seconds. That was at the beginning of October when the team introduced configuration caching. So that was a really, really big win for us. If you haven’t heard about configuration caching, please check it out. It has tremendous impact. Here’s another benchmark where we compared Gradle’s configuration time and execution time. And we see the same thing there in October. We see that the execution time of our Gradle task stays about the same but configuration time significantly drops and therefore also the total build time drops.
And last but not least, we had to run a lot of migrations. In the end, we were a small team. We were three developers on the Android side. There was no way for us to, for example, convert hundreds of modules to our module structure. So we had to rely on feature teams to contribute to our common goals. For example, there were some… A couple of migrations that we ran over the years, for example, migrating legacy modules to our recommended module structure while adopting Anvil, because for Anvil we could delete thousands of lines of code and also hundreds of wiring modules. So that kept the number of modules in our code base down a little bit. If you want to know more about how we do migrations, former colleagues of mine gave a talk at the droidcon in New York City this year. So you can check this out as well. But of course, not everything was perfect. And there were some challenges along the way and actually some issues that we haven’t solved yet. For one, the module count. Like I said, we constantly test the boundaries of Android Studio. Sync times were really, really a problem in our case.
Imagine, like I said, you change a single dependency and then you have to wait 20 minutes in order for Android Studio to update the model and import the project again and to show this new dependency in the IDE. That was painful. Some of the things we did in order to manage this pain was convention plugins, like I said. Through convention plugins, we were able to roll out changes across the entire code base easily. Then we used our benchmarks to hold ourselves accountable. Sometimes we introduced build time regressions ourselves and we caught this through those benchmarks.
Anvil had a big benefit. It produced, like I said, lines of code and we deleted a bunch of modules this way. Configuration caching, as you’ve seen in the benchmarks, had a huge impact. Think of our main applications. Developers still had to build the main applications from time to time, for example, when they integrated their feature. And if you have to build thousands of modules over and over again and configuration runs for every single build for two minutes before your actual build starts, that’s quite painful. And that’s what configuration source took away from us. So that was a big one. Another huge one was the partial IDE sync. That was a plugin I initially wrote internally. And partial IDE sync allowed you to only sync a subset of the modules in your IDE. For example, when you’re working in the demo module, you would say sync only this demo module and all its dependencies in the IDE. And this way, you would reduce the number of modules from 4,000 to maybe 100 modules.
And this way the sync was a lot faster and you could sync way more often. We never open sourced this to it but the fine folks from Dropbox did and they released a plugin called Focus. So if you need a similar solution, please take a look at this. This is a quiet efficient mechanism. Legacy modules were a problem because they were breaking our dependency rules that we had. For example, through legacy modules, you could get input to input dependencies. So the solution there is simply to finish the migration and that’s something the team is currently working on. Granular modules was a big anti-pattern we’ve seen and that’s one of the issues we couldn’t really solve yet. Let’s have a look at the example of why the… How this happened. Let’s assume we have a library called Login Screen and two other modules depending on this. Now feature B might decide it only needs a subset of the code from the login screen module. So what it would do, it would invert dependencies, extract the shared code into another library. This way in this setup now, feature B only depends on login strategies, meaning less code and probably also less dependencies.
And login screen would reuse the same code. For that, we increase the number of modules but we actually don’t have more code in the code base. So that caused a lot of stress or more stress for habituals. Another challenge for us was that in this setup and you have seen earlier the number of products and different screen sizes that we have, there are sometimes different implementations needed, for example, for the different screen sizes like I mentioned. So what we would do, we would introduce a new implementation module that implements the same APIs. In some instances, we had five, six, seven, eight different implementation modules for different configurations. So this increased the module count somewhat artificially but nonetheless, those different implementations were needed and that’s actually what dependency inversion allowed us to do. In my opinion, the development app share itself was a problem. It happened that bugs only occurred in demo modules and not in the main applications and vice versa. And it was dangerous because we relied so much on demo modules to run our tests and this… For this way bugs could actually ship in production.
Maybe we wouldn’t catch them in the main applications. So that was a concern. Ideally, the development app share would use exactly the same infrastructure like our main apps. But we had to develop it in order to get started with isolated development back in 2018 and ’19. And the last challenge was extracting UI tests. I mentioned that we wanted to move UI tests out of the main applications because they became a bottleneck. When you have an application module with thousands of tests and you have to run them, all of them over and over again, that’s very costly. So the idea was to move them all to demo apps and only keep the integration test. But while we see the right trend that the number of tests and demo modules went up, at the same time, also the test in the main applications kept growing. So that was a concern. Alright, there is not much time left for Q&A unfortunately but thank you for coming and hope you were able to take something away. Thank you.